If you’ve been around long enough in the hobby, you’ve personally experienced a failed carbon-fiber tail control rod or seen a friend suffer from such a fate. The typical failure mode is either pulling the link rod right out of the CF due to improper gluing or splitting the CF tube so that the link rod can just fall right out. This tech tip will show you a 10-minute method for preventing a split in your CF tube in flight, which can cost you a sh’load of money if you’re not prepared and can’t land a wildly pirouetting heli…
The reason that the CF tubes that we use for our control rods are so susceptible to splitting is because of how they’re made. They’re actually made of a uni-directional CF tow that kind of looks like long, black hair before its wetted with epoxy and formed into the desired shape. Since the uni-directional fibers are along the length of the tube, they provide great strength in tension and compression (pulling and pushing the tube from both ends), but they do next to nothing for the strength of the tube wall in bending or crushing.
So to add some strength to the tube to protect against bending and crushing stresses that can split it, we can wrap something around it where the link rods slide into the tube. What are we going to use? Dental floss! 🙂 To start, make sure that you’ve got the following stuff:
1. CF control rod with links already well glued/epoxied into the ends.
2. About 12-16 inches of non-waxed dental floss.
3. Thin CA.
4. CA kicker (optional, but very handy).
5. Two 2-inch lengths of heat shrink tubing.
6. Permanent marker.
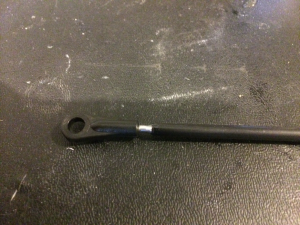
Ok, so we’re going to start with the non-reinforced CF control rod. I bet yours looks something like this, right?
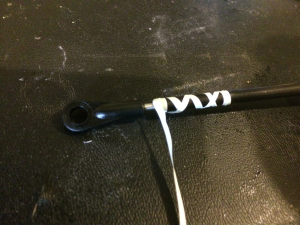
Using the permanent marker, make a mark around the CF rod approximately 1 to 2 inches away from the end of the rod on both ends. This is where you’re going to stop winding the dental floss. Cut a 6-8 inch piece of dental floss. Now, get out your thin CA and put a VERY small dab at the end of the the CF rod and stick one side of the dental floss to it. I use a toothpick to make sure that I don’t put too much CA on at this point. Make sure that it dries before you start the winding though or else you’re going to get stuck to the rod!
Next, pull the dental floss tight and make a single rotation around the top of the rod to make a circle and then start pulling it tight while wrapping it at approximately a 45-degree angle down to the mark that you made earlier. Once you get the mark, make another single rotation around to make another circle. You’ve got your first layer now and the next step is to go back up the rod with the floss but this time, make sure that your floss stays tight again and when it crosses your first pass lines, make sure it does so at a 90-degree angle.
Each time you get to one end, make another circle and move on to the next pass, but always lay the floss down directly adjacent to the last pass in that direction. You’ll start to see that you’re weaving a floss fabric together over the CF rod.
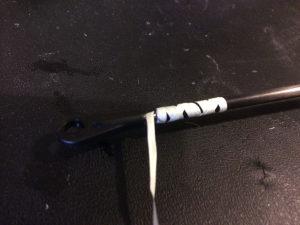
Soon, you’ll notice that there’s not much CF rod showing underneath the floss…perfect! Keep going until you’ve covered up the CF rod with successive passes and finish at one end with a single circle like you started. Now, cut off the excess floss and get your thin CA ready again. This time, you want to tack down the end that you just finished with so that it doesn’t unravel. Once that’s done, soak the floss with thin CA and make sure that a little gets on the boundaries of each side of the floss fabric so that it can soak up into the weave. I usually let it sit for a few minutes and then once it’s soaked, I hit it with CA kicker to harden it. You should have something that looks a bit like this now…
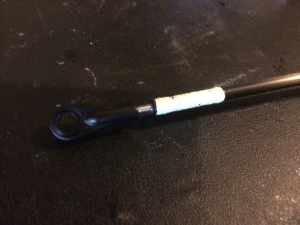
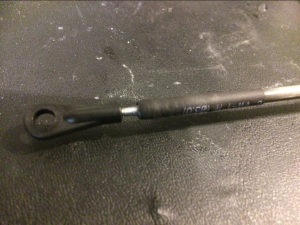
The final thing to do is to cover the floss fabric with a good, heavy-duty heat shrink to hide it and bind everything together. You may need to experiment with the size of shrink tubing and how much you need to stretch it with needle-nose pliers to get it to slip over the head of the plastic link, but that shouldn’t be too big of an issue. Remember, you want the heat shrink to be tight on the weave. Once you’re heat shrink is applied and cooled, drip a tiny bit of thin CA at one end of the tubing and let it soak in along its length. Do this one more time on the other end of the CF rod and this will seal the deal. Now you should be ready to install it on your heli and go beat ‘er senseless!
There are alternatives to dental floss if you don’t have any or you don’t have the patience to wind it as I’ve described above. I’ve also used brass or aluminum tubing CA’d to the CF rod in the same location, but that needs to be done before you glue the link rods into the CF tube. If you happen to have some loose CF tow of the variety used to make the CF tube itself, then you can wrap that instead, but if you’ve never worked with CF tow before, it’s quite messy and frustrating…to the point where it’s not worth the extra time spent or strength that it adds.
This is an easy trick to reinforce all of the CF control rods in your fleet to prevent stress-induced splitting of the tube and failure in flight. For the few minutes that it takes to get this done, I think you get some pretty decent insurance on those valuable “toys” of yours. As always, let me know if you have any questions. Good luck!
– Justin