3Digi FBL System
by
R2 Prototyping
Written by: Nick Lenn
With so many different FBL controllers out on the market now it can be a very overwhelming choice on which one to go with. The good news is that because of all these choices the quality, and function of FBL systems has skyrocketed over the last couple years. Well, R2 Prototyping has come out with the 3Digi FBL system and is one of those new products that has stepped into the market with an amazingly affordable price and claiming to stand toe-to-toe with the best of them for flight performance. Could it be true? Well, let’s find out! Thank you very much to Danny Melnik from DemonAero.com and AeroPanda.com for helping us put this review together.
Now before we start I want to let everyone know that this product is fresh into the US market and there are still a LOT of features that will be implemented, but are not at the time of this review. R2 is working very rapidly on adding features, and with my discussions I’ve had with the flight testing team I am confident in the direction their headed.
Setup:
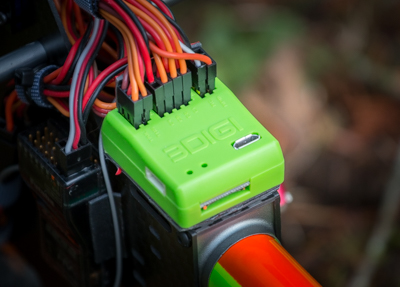
The 3Digi is available in two different physical units. One is a standard FBL system and the other is called the High Current (HC) version. The HC version has it’s own power leads to be powered from. This ultimately leaves more open ports on the FBL unit and can make for a really clean setup if you’re powering the unit with an RX pack as you won’t need to make your own Y-Harness for redundant power. The unit is very compact in size with all of your typical ports including a dedicated RPM port, RX port, two satellite ports, USB port, a flexible use port, and a MicroSD card port. I personally thought the MicroSD port was a neat feature and can be used for recording of flight, vibration, and GPS data. Both manual and software is available on the www.aeropanda.com website. I would highly recommend reading through the manual. This is a very rare case where the manual is absolutely amazing! There are however, some small warnings that need to be heeded like do NOT power the unit through the RPM port. That port provides a 3.3v output to power external RPM sensors and you could damage the unit if you supply voltage through it. Also, the information for actual pin outs on the Variable port are in the back of the manual with the information and specifications needed for each type of sensor. I can really appreciate their open minded approach to this unit. Software installation is an absolute breeze and throughout the entire course of the review I did not have one single time where the unit didn’t connect on Windows 10. The software is fast and responsive and to me, that’s a really important key to a good overall experience. I should also add that now there is a Bluetooth module and Android app that just released that you can use for programming too.

Upon power the unit for the first time, or after a firmware update, the software will ask you if you want to proceed with an Initial Setup Procedure. Setup is very straightforward and if you’ve done any sort of FBL system setup before you will have no problem with any of the steps. It first walks you through a receiver menu where choose your RX type and then into the transmitter calibration menu where you calibrate your main surface functions as well as your auxiliary channel mapping. One feature I thought that was kind-of cool a little later on is the PowerOn initial delay. Some RX systems like Spektrum need a little more time to initialize and bind so increasing this feature prevents issues with initialization. Also note that this unit has Parameter Sets (also known as bank switching) and you program that switch in there as well. Next we go onto the swash plate menu where you can pick from one of the preset swash plate designs or completely build a custom setup. Next we move onto the Swash Servo Settings menu and like a lot of the menus we have both the standard and advanced options. You can pick your servo frequency, and set advanced limits on them if you like. This is really helpful later on for getting a perfectly level swash plate at both high and low stick. Now under the Swash Plate Travel menu you should set your cyclic for 10* of travel and set your collective pitch according to your personal taste. I should note that one neat feature here is the ability to set both aileron and elevator cyclic values. I believe, this is key to a much easier tuning process as your teaching the FBL system in the beginning any bad mechanics that the helicopter was designed with. Each of the slider bars will start to turn yellow, then red, if your values get out of the ideal throw ranges. It’s also got neat little feature and tab called Manual Servo Control which you can check boxes that will lock your collective, cyclic, and tail servo at neutral settings for setting up all your servo horns.
Tail setup is very standard and includes picking the tail servo settings that correspond with your servo as well as setting the limits for both left and right throw. The Throttle settings include limits for both high and low throttle as well as offer the ability to set a custom failsafe value for the throttle during a loss of signal from the 3Digi to the RX. Next we move to the Gyro Installation box and set the orientation of the unit to the helicopter. At this time the governor function is not active but there is still a Governor box for you to input your gearing information as well as your tail gearing information. This is currently used for logging purposes. Now you can also set which of the three, or all of them, the unit uses for vibration analysis under the Vibration Data Analysis box.
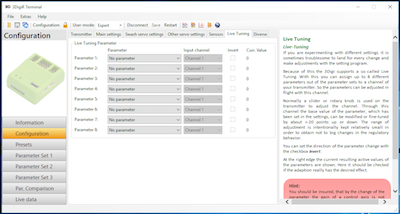
Live Tuning is one of my favorite features and this FBL system really does a great job of it. What you do is map one of EIGHT, yes I just said eight, parameters to a switch or rotary knob for tuning in flight. Now the channel you’re adjusting is using the base value that you set in the tuning portion of the FBL system as its foundation value, but it will allow about +-20 points of adjustment with the Live Tuning Channel. This is so you don’t do anything too drastic in the air and cause a crash. The Variable Ports box is where you setup your three ports on the side of the unit by either picking Spectrum satellites, GPS, or Bluetooth. Also note that this system does require you to push the SAVE button on the toolbar. No changes are stored until you click that little button!

Flight Tuning:
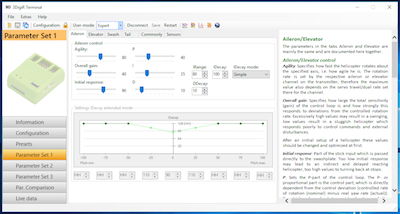
Now we step into the Parameter sets and start our tuning! Each Parameter set gives you the option of an infinite amount of tuning. The Preset Model Size feature really helps you get the settings close. Just pick which size model you’ve got and it will help put all the parameters in a good starting range. Same thing goes for the Agility. There are preset starting points for you to choose from. When it comes to tuning this is where the 3Digi prevails. Whether you want simple, or access to your P,I, and D settings it will allow you to tune and tweak until your heart is content. You’ve got basic settings like overall gain, and more advanced settings like Initial Response and IDecay. You name it, you can tweak it!
They took the same approach with the tail tuning as well. Settings can be easily adjusted like the agility, overall gain, and initial response or you can dig into the PID gains. There’s also a feature that I’ve NEVER seen in any other FBL system and that’s the ability to add or subtract overall gain during specific tail inputs. So you can actually subtract tail gain during right rudder input your visa versa. Insane! What I really want you to take away from the tuning portion of the review is that this unit has some of the most vast tuning options I’ve seen, but it’s complemented without the NEED to dig into those if you don’t want.
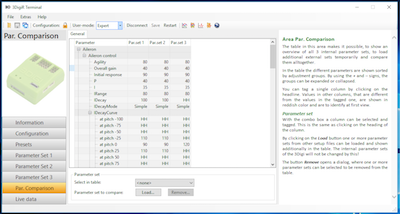
The 3Digi also supports an Auto Trim feature. When activated, if you power up the unit at mid stick instead of low stick it will active the Auto Trim feature. You can tell because instead of the unit doing two the circular stirring patterns it will do one, pause, then do the other. The heli needs to ideally see a about a good solid 30 second trim flight for the status bar to move all the way over into the green area. Now when you land just move the collective stick all the way down and wait there. After about 3 seconds the values will be stored and you’re good to go. Then just go and click the Copy Trim Values to all Parsets button and they’ll all be stored across all of your Parameter Sets. There is a menu called Area Par. Comparison which is really neat because it’s like a full spreadsheet for all of the parameters of all your Parameter Sets. It’s a great way to get a big overview of all of your settings for that particular parameter. You can also load and save each parameter set as well.
Data Logging/Analysis:
The flight data analysis in this unit is very powerful! The software gives you the ability to graph all your parameters, and will even display dual graphs! Can you say nerdgasm! We’re not talking a couple of parameters here either. We’re talking all of any. Almost any information that flows through the unit can be graphed here. Get an un-commanded tail movement in flight? Well here’s the perfect way to prove it and help diagnose it. You can put your input on one graph and the actual rotation of the unit on the other. WHAAAAT! This is insane and takes data logging to a whole new level! It also does logged, and LIVE vibration analysis to help you track down those pesky vibes either by yourself or live with the help of a fellow pilot. Flight Performance: The flight performance of this unit is just astounding. How they were able to get it to fly this great merely by using the presets is beyond me. I had to do very little tuning to get it to fly the way I like it. With the exception of normal gain, initial response, and agility adjustments on the cyclic I did slightly adjust the iDecay to get a little more “flowy” of a feel to the head. The great part here is that the manual does an exception job at explaining each of the parameters and I found them to very predictable in their adjustments. The tail tuned in very quickly and, just like the cyclic, I only made adjustments to the main gain, agility, initial response, and some adjustments to the stop gains. I saw no whipping in the tail and found the parameters to be very predictable in their adjustments as well. Now to be fair I did only fly this on one model, but what gives me the confidence to say that I don’t think that really matters is that I was easily able to dial in that model without touching a single advanced parameter in either the cyclic or the tail. That gives me the confidence that those parameters are there if I need them, but that I don’t have to automatically go straight to them for every heli. I think this is key when you’re learning, but also leads to a unit that you can grow into as your skills increase. Conclusion: How they’ve managed to get the 3Digi to market at this price point and functioning this well is still something I struggle to comprehend. Flight performance wise, I think it’s right there at the top. Period. Software wise I think it’s some of the best software I’ve used and is both powerful and intuitive. The only, and I mean ONLY, thing that is holding this unit back from being in the top three is the lack of a governor, possibly a bailout, and direction TX tuning. The good part is that the unit is capable of all of them, and some are currently being worked on. The logging is the best on the market. The tuning capability is on par with the best on the market, if not slightly better, and I see a very bright future for the 3Digi. Do not mistake this unit for an entry-level FBL system. It’s the real deal! Thanks again to Danny for getting this unit to me to review. It’s been a great pleasure and I look forward to seeing where the 3Digi is in the future.
