The Gaui R5
Written by Justin Pucci
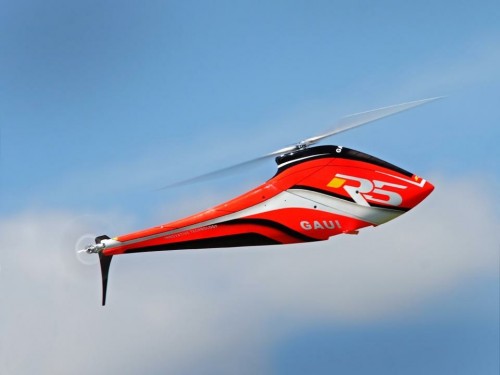
Speed flying…a topic that seems to continue to grow in interest level across the helicopter hobby in the midst of all this speculation about the industry shrinking in other areas. Part of a shrinking industry is companies being unwilling to try something new, but lucky for me and my fellow speed freaks, Gaui hasn’t jumped on to that band wagon. Nope, they came out with a speed helicopter, didn’t they? …and they didn’t just come out with ANY speed helicopter. No! They released a 550-class speed helicopter! Whuuuuuut?! Without further ado, I introduce you to the Gaui R5. Now, before I move on, I’ve got to thank Gaui and their Director of Marketing, Mr. Howard Tan for the amazing opportunity that they gave us to review this model.
So, when you think about it initially, you’ve got to ask yourself: “Why did they release a small speed heli?” I know, right? The little action that does occur in the speed world is at the highest levels of sophistication with full 700-class, fuselaged, limited production run, engineering marvels that only a few percent of the hobby’s population can or is willing to afford. The first and most obvious answer is that we’re talking about Gaui here. They’ve never been known for playing things safe. Just look at their first fuel offerings: the NX4 and NX4-G.
Well, let’s follow that logic a bit further… If this speed thing is really going to stick around, then aspiring speed freaks need an avenue to get started with something that’s more serious than your typical 3D pod-and-boom tuned for going fast. SAB released their gateway speed 700, the Goblin Speed, but made it 3D’able, so if speed didn’t end up sticking around, at least they’ve got a cool lookin’ 3D model. That’s exactly what Gaui did with the R5. They created a gateway model that, in many ways, is superior to the Goblin Speed’s approach to “gateway drugs.”
This is a smaller heli, so there are limitations in terms of how fast it can go and whether it can ultimately be competitive with the big boys, but it’s a full-fuselaged, 550-600 class heli with a 700-class drive train that’s capable of handling some serious power. On top of that, the price is a few hundred dollars lower than the Goblin Speed at $1079 and it has a much more authentic speed-like look and feel. So, if someone’s going to get into speed and eventually make it to the big fuselaged models, they’ve got two speed-specific ways to do it and one of those paths lead through Gaui. Not a bad business model, eh?
Overview
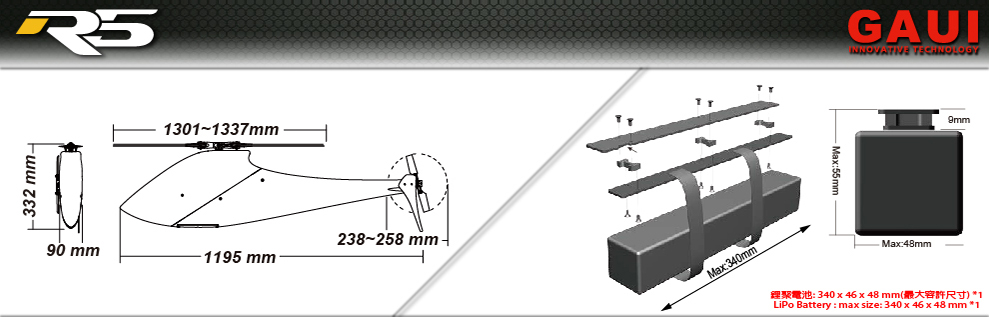
Ok, let’s get into the specifications of the R5 before we break the box open. This model has an overall length of just under 4 feet (1.2m) with the ability to spin 580-611mm main blades and up to 80mm tail blades. Mine came in at a weight of 9.5lb (4.3kg) ready to fly and is a staggering 90mm wide at its widest point in the fuselage. The R5 uses a two-stage transmission with a belt drive between the motor and secondary shaft gear, which then spins a pinion that drives the main gear and tail belt pulley. The two pinions currently available to match up with the effective single-stage main gear tooth count of 164.3T. The 21T pinion comes stock and gives you a 7.82:1 ratio and the 22T upgrades brings you down to 7.47:1. The tail ratio comes in at 4.67:1, which is more than enough for a speed heli to keep pointed in the right direction.
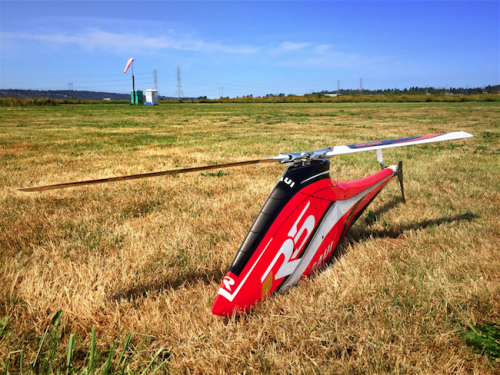
The R5 box is cardboard with a nicely printed sleeve that bears the R5 and the Gaui logos in a very nice and shiney finish. It’s extremely clean and eye-catching! Once you remove the sleeve and open the box, you’ll quickly find yourself staring at the best part of every box opening: the canopy…and this time, there’s a fuselage to go with it! 🙂 The packaging of the canopy and fuselage sections is aided by a few pieces of foam and some plastic bags. The only other thing that is readily visible at this point is the main frame pieces and the blades.
Yes, you heard right! Gaui provides a set of Halo 580mm main blades and 80mm tail blades with every R5 kit. A small triangular shaped cardboard section built into the box contains the remaining parts of the kit, which are organized carefully in individual bags or sets of bags that grouped by sub-assembly. One of the first things that caught my attention being that this was my first Gaui build was that they include all the fasteners in individual bags that are labeled by the fastener size. No more hunting through piles of screws, nuts, and washers with a pair of calipers. Simple, but a very cool feature nonetheless…

The Build
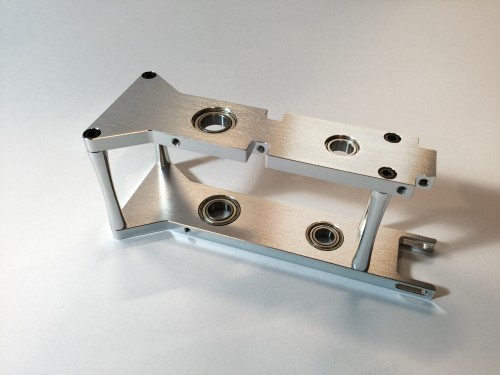
Bearing Blocks
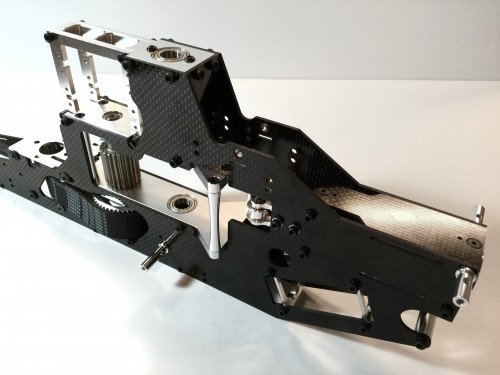
The core of the helicopter is based on a very stiff, stacked bearing-block system that includes three blocks with large 10x19x5mm bearings that support the 10mm main shaft and 8x16x5mm bearings that support the 8mm secondary shaft. These are built up using very stiff aluminum posts and topped off with an aluminum servo mounting system that is designed to use standard-size servos. The motor mount and the motor shaft counter bearing support are smaller aluminum blocks that slot into the middle and bottom bearing blocks, respectively so that the belt tension can be adjusted. The R5 benefits from a rather tight belt. The best way to accomplish this is to use a rubberized driver handle or pliers handle to push between the motor can and the front of the servo mounting block while tightening down the four screws. This can be done with one person with enough practice, but if you’ve got a helper, then definitely take advantage of it!
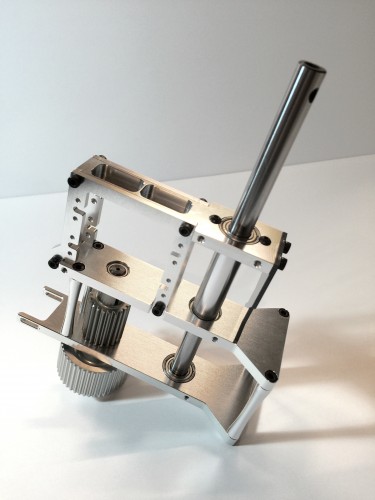
Transmission
The R5’s transmission system is probably one of the most impressive features of the design. You have the option to run a 21T or 22T motor pinion, which drives an interim autorotation drive gear of 46, beefy aluminum teeth via a belt. This auto-drive gear then rotates the secondary shaft 21T pinion, which interfaces directly with the monster 75T Delrin main gear. The main gear design has been optimized to be very light weight while still having the ability to handle a full 700-class power system. At 21mm in height, there’s a ton of tooth engagement area on the main gear. To drive the tail, the main gear attaches directly to a 42T tail belt drive pulley on the top side. Be sure to use lubrication on the secondary drive pinion and the main gear to minimize friction and the possibility of premature gear wear. A lubricant such as Tri-Flow grease, Ketenol, or Dry Fluids gear lubricant is perfect for this application. I personally choose to use Dry Fluids gear lubricant.

Frame
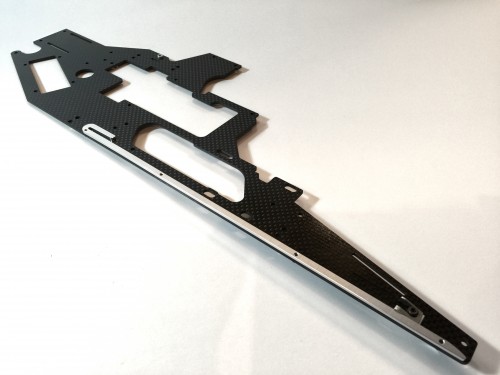
The airframe of the R5 is a very narrow, very minimalist design that makes such an aerodynamic fuselage a reality on this model. Believe it or not, the distance between the two carbon fiber frame sides (they’re real carbon fiber, by the way) is a mere 27mm…that’s only a tiny bit over one inch in width! Despite this very small frame volume, the design has been well thought out by Gaui engineers such that wire routing and component installation is extremely simple. Most of the time, I find the need to customize my models with a Dremel tool and drill by adding features that make wiring easier, but this design already includes all the necessary features. I’d have to say that this is among the top 3 models I’ve ever built in terms of ease of wire routing.
Of particular note on the frame build is the tail belt tensioner, which is composed of a large, J-shaped piece of spring steel that loads a lever arm with a belt roller at the end. The spring steel is very strong and unlikely to wear out with regular abuse… In fact, my bet is that it’s the last thing on the model that you’d need to replace. This is pretty cool feature in my mind because one of my typical frustrations is the loss of spring tension on other belt tensioning designs that necessitate replacement of the spring, rubber band, or other mechanism.
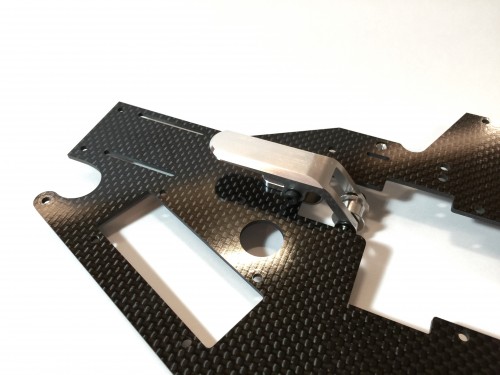
The other really cool feature of the frame design is the slide-and-snap battery mounting system. The two frame sides have long, thin aluminum rails mounted to their inside surfaces and the left frame has an aluminum spring clip at the front. The battery tray is composed of two long and thin carbon fiber plates separated by aluminum spacers to allow for running straps around the batteries without them getting caught up in the frame rails. Simply push the battery tray into the frame rails and when you get to the stops at the end, you’ll hear a nice click from the front clip indicating that you’re secure and ready to fly! Removal of the packs are just as easy… I actually found that putting a very small amount of Tri-Flow on the rails makes install and removal even easier, but it’s not at all necessary.
Once you’ve gotten the main portion of the airframe built, then you get to move on to the underbelly and retracts. I call this part of the airframe the underbelly because without the fuselage on, it looks like the mouth and belly of a whale or other large filter-feeding fish. Really what we’re dealing with here are a set of carbon fiber ribs that are oval-shaped and extend down below the lower bearing block to form the open area where the batteries are housed. At the very bottom is a final bearing block that houses an 8x12x3.5mm bearing for use in the retractable landing gear mechanism.
Oh yes, the part everyone has been waiting for…the retracts! 🙂 Gaui has really outdone themselves on this one. While you’re on the bench, the purpose of the retracts on the R5 are to act as the forward two points in a reverse three-point landing system, which includes the tail fin; however, when you’re ready to take to the sky and get your speed on, they rotate 90 degrees in line with the model and “disappear” into the aerodynamic profile of the fuselage with the flip of a switch on your transmitter. This is accomplished via a micro servo with a link rod attached to an arm that clamps to the 8mm shaft on the retracts through the bearing block…and get this! The servo and its own 5V in-line step-down regulator comes with every kit!

Head and Swashplate
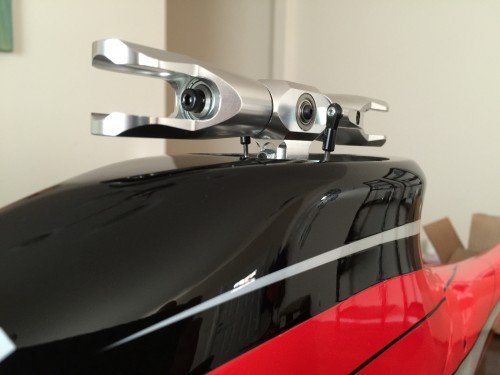
The innovation doesn’t stop at the airframe… Gaui made sure to include some really great bits in the head and swashplate too! If you’ve ever owned a Gaui X5, then the head will look familiar to you. That’s the designers of the R5 took an X5 head with the integrated spindle swiveling system and shortened the width of the central head block to reduce aerodynamic drag during high-speed flight. With an 8mm spindle capped off by beefy M4 screws, the head is designed to handle the loads inherent in high-RPM speed flying.
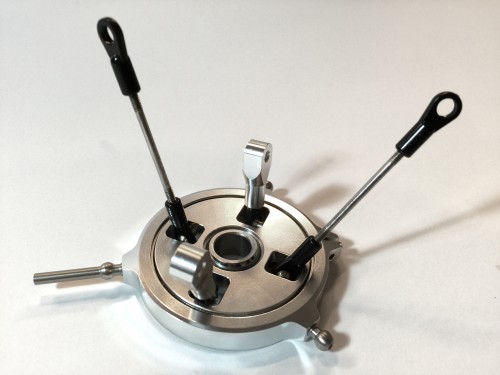
The swashplate is the real gem above the top bearing block though… With a massive 40x50x6mm outer bearing, and a two-piece inner swash structure that fully encases the inner swash balls, this thing is serious business. My nerd note on this one is that I like the way that Gaui did the follower arms. Instead of a standard threaded rod or full-plastic swivel arm, the R5 followers have a large diameter inner bore that is threaded. To add the links, you just take a standard Gaui link and thread it in to the inner diameter of that bore…it’s threaded onto the OUTSIDE of the plastic link! Cool, huh?! 😀
Tail Assembly
The final major portion of the build that has to occur prior to putting the fuselage on is the tail. Now, the tail boom itself is very simple to deal with and not dissimilar from any other belted heli kit out there. The tail rotor assembly goes together very smoothly and I personally didn’t run into any binding issues with either of the R5 kits that I built for this review. This is quite an impressive statement to make given that the R5 uses not just an over-under tail slider system, but also a bushing/fastener based linkage rather than the more typical ball links to adjust tail pitch.
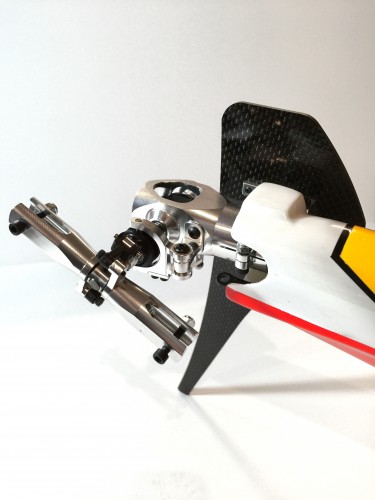
The tail fin is a great little innovation that Gaui gets bonus points for in my book. They’ve taken a simple, relatively large-area carbon fiber vertical tail fin and placed it on a swivel so that you can adjust the angle of the fin to contribute counter-torque thrust to the tail during high-speed flight. This results in a reduction in the power necessary to do the same job with the tail rotor, which leaves more power for you to put to the main rotor…for speed!

The tail case itself, while a beautiful work of CNC art, is also not a very complicated assembly to build. The case is a single piece of CNC’d aluminum with a flanged bearing installed in the left side and an opening in the other side. This opening allows for a small aluminum plate with the other flanged bearing to cap off the output shaft and hold everything together. This is actually a very important feature of the design, because it’s what make taking the tail case apart and removing it much easier. Yep, that’s right! Taking it apart and removing it is necessary to install the…
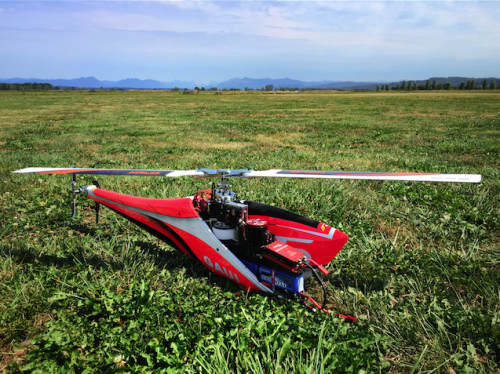
Fuselage
FUSELAGE! Yessss! This is a part of the R5 that sets it apart from pretty much every other helicopter out there save for a few other fuselaged models like the MiniCopter Diabolo Speed or some of the custom, aftermarket fuselages for the Henseleit TDR. The fuselage is made up of two pieces: the canopy and the tail sections. They are both made of standard automotive-painted fiberglass with judicious use of carbon fiber cloth in high-stress areas of the tail section near the retracts.

So as I was saying above, to get the tail section installed, you need to remove the tail assembly that you just finished building so that you can fit the tail boom through the narrow length of the fuselage. Ok, here’s a tip…before you start this step, note that the plastic tail pulley that’s attached to the tail output shaft splits apart to make removal of the shaft from the belt easier. It will require you to depress the belt tensioner too to give you as much slack as possible. Finally, make sure that you take a piece of tape and place it across the opening of the tail boom and through the loop of belt that sticks out. Why? Because it prevents the belt from slipping back into the boom while you fiddle around with the model trying to get the tail section on. Nothing is more frustrating than taking a step back to admire your new fuselaged model only to realize that not only do you have to remove the fuselage, but you also have to remove the tail boom to fish the belt back through it. Arggg… Been there. Done that. 😉
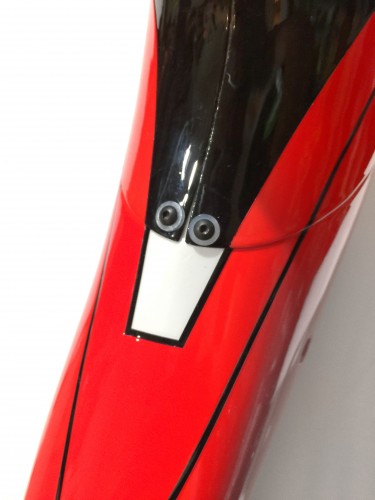
Now that you’ve got the tail section attached, you’ll notice that the front canopy section simply slips on…well, not quite simply. Now, here’s the thing. As a speed freak, I fully expect canopy install and removal to be a pain in the butt, so this is really not a big deal to me. That said, if this is your first speed heli, then you’ll want to take some time to familiarize yourself with how to install and remove the R5’s canopy before you head out to the field and make a fool of yourself in front of your friends. The way this works is that there are small metal posts and magnets at the bottom of the opening on the tail section and metal posts with heads on them (like a nail) and magnets at the top. On the canopy, there are fiberglass rails that match up with the posts and magnets such that when you slide the canopy on from the front, the rails lock into place. To close out the back portion of the canopy that wraps around the head and swash, there are two high-strength magnets that hold the two sides together.
Now, I have a version 1 kit, which only used the above-mentioned magnets to hold the canopy together at the back. As such, I quickly learned that there’s a risk during high-speed flight (especially with pitch-ups) that the canopy comes loose at the top and gets hit by the underside of the main blade grips. This isn’t as bad as you think, as I don’t believe it’s possible to have the canopy sucked off and into the rotor, but it will scare you a bit and bang up the top of the canopy. I prevented this from happening by simply using the speed freak’s best friend: packing tape. Luckily, Gaui recognized this issue quickly and all the new kits now ship with two PEM nuts installed at the back-top of the tail section that match up with two M2 screws that run through either side of the canopy to hold everything together. Quick and easy!
Component Setup
Ok, so there’s my setup and then there’s what will work just fine for most people out there. I don’t say this to be arrogant, but rather to explain that what I had “laying around” when this review came my way is well in excess of what is needed to make this model go fast. So, let’s talk…
My setup is as follows:
Kontronik Kosmik 200
Xnova XTS 4530-525kv and XTS 4530-600kv motors
MKS HBL665 HV cyclic servos and MKS HBL669 HV tail servo
Bavarian Demon 3X flybarless system
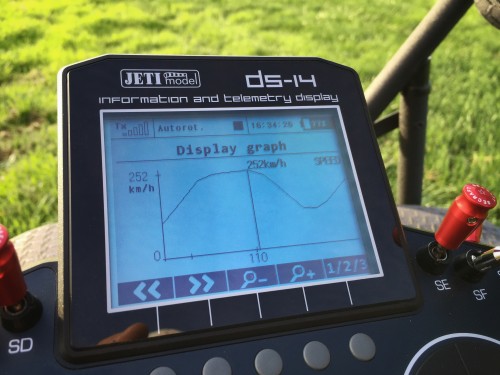
Jeti radio system with a Jlog 2.6 running telemetry from the Kosmik
PowerBox Systems GPS-II for speed measurements
OptiPower 6S 2700mAh 50C packs wired in 12S configuration
Let’s take it one item at a time now to figure out what you NEED to have as a minimum to make the R5 work correctly.
For the speed controller, Gaui recommends a 160A as a minimum, which I tend to agree with for beginners. This is because as you’re learning to fly speed, you’re not going to be managing your cyclic and collective all that well on the entrance and exit to a speed run and this translates into large current spikes. That said, I went out of my way to fly poorly and never saw a current spike that exceeded 151A…and this was for only 1 second in duration. What does this mean? Well, I personally wouldn’t have an issue with running a 120A ESC on my model, but if you go with a 160A, then you should be perfectly fine.
The motor is an area where you’ve got a lot of flexibility. The R5 can fit any motor up to a stator diameter of 45mm and a stator height in excess of 35mm. For those that don’t know motor language, that means a 4535 motor…that’s a beast of a power plant! So, what do we need? Well, having a 4530 is certainly something that will allow your motor to grow with you without replacements, but you don’t NEED it. I happen to think that the 4525 series of motors that are available are a great choice. A bit lighter weight, cheaper, and still plenty powerful, a Scorpion 4525 or 4526-520kv motor would be an ideal choice. If you want something a bit ligher yet, then the Scorpion 4235 Nick Maxwell motor isn’t a bad choice either.
Servos are pretty much not a big deal nowadays, as all of them are plenty powerful to handle a 550-class speed model. The R5 requires standard-size servos from a fitment standpoint, but as for the performance of the servos, I’d shoot for something with 150inch-ounces of torque or more. Speeds of 0.1s or faster is more than sufficient, as the torque is much more important in speed flying. So, at this point, you get to choose whatever your favorite brand is…Savox, BK, Futaba, MKS, JR, etc. It’s up to you!
We’ve covered the major components, so now I’m just going to give you a quick debrief on the remainder of the items needed…
Choice of flybarless system is very personal, so I won’t tell you what to use especially since the beginner speed freak will likely feel most comfortable sticking with their go-to unit. Right now, almost all of the FBL systems out there are speed-flyable, but some are easier than others to tune. I would say the three top systems in terms of features, tuneability, and performance SPECIFIC to speed only are Bavarian Demon, BeastX, and Vbar. If your preference falls outside of that short list, then you’re still ok, but you may have some challenges getting tuning help from other speed freaks as most fly the three mentioned.
The choice of radio system shouldn’t cause you any stress at all. Why? Because you’re going to fly what you fly. If it’s got telemetry, it’s a definite plus, but anything with two sticks and 2.4GHz will get the heli moving fast in one direction. If you are interested in measuring your speed, there are a lot of options out there, but frankly there’s only one that’s worth it. The PowerBox Systems GPS-II is designed specifically to measure speed very accurately using the Doppler technique. Myself and other friends have personally compared its results against the official timing results of our flights at the 2015 IRCHA Speed Cup and it is always within a few kph of the official speed. For $88, you can’t go wrong and it interfaces with almost all of today’s telemetry-ready radio systems.
Finally, batteries are also a personal preference. The only thing you really need to pay attention to are the maximum pack dimensions given by Gaui. Your full stick pack must fit within a 46x48x340mm space, which pretty much limits you to something in the 6S 2500-3500mAh range of capacities. Between Pulse and OptiPower alone, there are several different packs that will fit the R5, so you shouldn’t have too much trouble with finding one that works.
Flight Performance
Alright, we made it through the build…now let’s talk flight performance! I’ll start with what everyone is wondering about: the retracts. First off, they’re not as bad as you think. To take off and land, you should look for something level and not bumpy or with pits or holes in it, but generally speaking, the heli is a lot more stable on the three-point landing system than you’d expect. The best advice I can give is to take off as straight up as possible with no tail rotation and land by hitting throttle-hold as close to the ground as you can get and slowly dropping pitch to add down-force to the model once you feel like it’s on stable ground.
The R5 in high-speed flight is actually a very pleasurable model to fly once it’s tuned up. The first point is that you need to make sure that you’re CG is nose-heavy. This shouldn’t be an issue with any of the components that you could choose to put in it, as the model is designed to be nose-heavy as a standard. With a knife-edge nose-down angle of 15 degrees and at a weight of 9.5lbs ready to fly, my R5 locks into a speed run so that it feels like it’s flying on rails. This does take a bit of tuning though, so here we go.
Stock Setup
First off, the stock setup has limitations. In particular, the Halo 580mm blades make it a challenge to keep the model from pitching up beyond a collective pitch of approximately 14 degrees and head speeds in excess of 2700-2800rpm. This is mainly due to the light weight and center of gravity characteristics of the blades, which stray from that of a standard speed blade in that they are light with an aggressive-off-center chordwise cg with not tip sweep. That’s ok though. Gaui and Halo still gave you a stock blade that will get you well enough into the speed scene to make your butt pucker…trust me.
At 14 degrees of collective pitch and 2700rpm, I’ve measured consistent average speeds between 205kph (127mph) and 225kph (140mph), which is cooking! The first time you hold a solid line at 140mph, you will literally freak out with adrenaline overflow, so don’t feel like you’re heavily limited by the stock setup. That said, if you do try to get yourself up above 14 degrees and 2700-2800rpm, then you’re likely to find that the model is far more sensitive to cyclic input at high collective angles…especially at the back end of the run when you’re ready to pull up. If you feed in too much elevator before removing cyclic, then you’ll get yourself a pitch up. Ouch! In terms of electrical parameters, I’ve seen average currents in the 80-100A range with peaks upwards of 120-130A with the stock setup, so nothing too major.
Advanced Setup
When you’re ready to move on to something a bit more spicy, then strap on a set of Radix 600 V2’s, Rail 606’s, or DH611’s. Make sure that your drop your tail blades down to the 70-72mm range though, so you don’t have to worry about blade strikes. With these larger, heavier, and swept-tip blades, you can start to push your head speeds and pitch up. Now, to get above 14-15 degrees of collective, you’ll need to shorten your servo-to-swash links to lower the center point of the swashplate in its travel such that you have more throw in positive than negative. This will get you well into the 16-17 degree range.
I’ve now run the Rail 606’s and DH611’s over a range of head speeds from 2500rpm up to 3200rpm and up to 16 degrees of pitch and they are rock-solid stable no matter what you give them. What they’ll give you in return is blistering speeds in excess of 260kph (161mph)! Since making this upgrade, I’ve been measuring average speeds in the 230kph (143mph) to 245kph (152mph) range at 2800rpm and when I bumped it up to 3200rpm with my custom-wound Xnova XTS 4530-600kv motor, I’ve gotten myself moving at up to 260kph (161mph). For what it’s worth, those speeds are well into the 700mm open class-to-lower-unlimited class range of competition numbers. So, with the R5 you’ll be able to pretty much go as fast as you want within reason and definitely fast enough to be competitive in its class for now at least.
During these higher-speed runs with the larger blades, I’ve seen average currents around 100-110A with peaks up to 150A for very short periods of time (<1 second), so we’re still talking a 160A speed controller, which is really cool! Where do we go from here? Well, I suppose that if you wanted to get to a higher headspeed yet, then you could run a higher kv motor if you can find one in this size range or you could bolt on a set of 14S packs. I’ve heard of a few people trying to do the latter and getting head speeds up to 3500rpm, but that will be challenging for most people until the battery manufacturers start to come out with a 2000-3000mAh 7S pack. Rumor has it that OptiPower has one in the works though…
Tail Fin Adjustments
Remember we talked about that cool adjustable tail fin? Well, here’s where it makes a difference. To add counter-torque thrust to the tail, you need to angle the fin so that the trailing edge is towards the fuselage. In other words, if you’re looking at the fin from above, you want to rotate it counter-clockwise from inline with the fuselage. You’ll have to play with this a bit, as there will be differences between different setups and flybarless systems, but I’ve found that an angle of between 8-10 degrees for the stock setup above and 12-15 degrees for the advanced setup above yields a 10-15 point reduction in tail gain when tuned properly. That’s awesome! Just think of all the extra power that you’ll be able to use productively to get you moving faster…
Conclusions
Well, we made it to the end of the review. If you’ve lasted this long, then by now you’ve hopefully realized that what Gaui has given us in the R5 is nothing short of spectacular for anyone interested in a reasonably-priced entry level speed model with potential to go far beyond entry-level speeds. At a retail price of $1079, the Gaui R5 is on the high end of the 700 class pod and boom market, but still maintains a healthy few hundred dollars of margin between it and the next gateway model, the SAB Goblin Speed.
Gaui had a few issues upon initial release, but have either already fixed them or are in work to improve them going forward. If you’re buying a kit now, you won’t have to worry about the canopy popping off during flight anymore and if you still can’t find yourself getting comfy with the retracts, then hang tight, because rumor has it that Gaui is working on an improvement to the design that will take some of the pucker factor away from something as mundane as taking off and landing. All things considered though, they did an amazing job bringing their first-ever speed model to market. It’s no doubt set them up to be the main gateway into the speed world from now until someone can offer something comparable. I hope you’re listening, other manufacturers! 😉
So, let’s summarize. During my R5 review, I’ve logged 67 speed flights encompassing 402 speed runs with an average flight time of 2.5 minutes totaling almost 3 solid hours of stick time. Each run has consisted of approximately 300m of distance covered for a total distance traveled of over 75 miles. Finally, with approximately 4000mAh of capacity burned per flight, I’ve logged just under 270,000mAh since the maiden.
I must say that I’ve thoroughly enjoyed my time with the Gaui R5 and it will continue to be a staple speed model in my fleet not just as a go-to training heli, but also as a serious competitor in the budding mini classes on the competition circuit. Once again, I’d like to extend our sincerest thanks to Howard Tan and Gaui for the amazing opportunity to review this model and to our listeners for your continued support and interest in our reviews. If you’ve got any questions, then as always feel free to contact me at .