
Losing receiver power mid-flight is probably one of the scariest scenarios we can encounter. Every day, models are being pushed harder and harder and with the demand of high voltage servos and power hungry maneuvers, having a back-up power system for your receiver has become an absolute must.
In this review, we’re going to take a look at the Buffer Unit by R2 Prototyping. Of course, a big thank you goes out to Danny Melnik at www.demonaero.com for sending this unit to us to give our opinions on. Back-up systems are still a growing and ever-changing market and we’re very interested to see how R2 Prototyping has approached this.
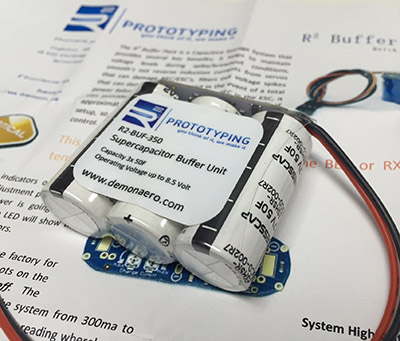
Right out of the box, you will notice that this is definitely not like anything currently on the market. Weighing in at just under 30 grams, it’s very lightweight and, believe it or not, there is no battery! Wait… what?! Yep, you heard that right. The Buffer Unit does not use any sort of battery at all. What it uses is a stack of three super capacitors for a total capacity of 150 farads. Notice, I did not say micro farads. These capacitors are the real deal at 50 farads each. Very impressive! They’re arranged in a configuration that reminds me of an old NiMh receiver pack and neatly wrapped in clear heat shrink with the circuit board mounted to the top of them.
On the top of the circuit board, you will find a couple items of interest. First are the two LED’s. One red and one green. The red LED illuminates when the Buffer Unit is powered up and in an active state. The green LED indicates charge status of the capacitors. A very unique feature of the Buffer Unit is that there is no power on switch. It’s powered up simply by turning your receiver power system on. Once it senses an input voltage change higher than it’s current voltage it begins charging the capacitors. When they are fully charged the green LED will illuminate. One thing I should mention is that you do not particularly need to wait for the unit to fully charge before moving or flying it. It will continue to charge when spooling up or even in flight for that matter.
Close to those LEDs is a small button. This button is used to power the unit down after flight. A typical end-of-flight routine would be to unplug your receiver power system them simply reach over and push the power down button and you’re receiver system will then power down. When in a powered down state the Buffer Unit is designed to slowly bleed down the charge of the capacitors so they’re not just sitting there charged all the time. This is a great safety feature.
Finally mounted on the circuit board are two small potentiometer dials. One of them controls the rate that the unit charges at. The default rate is set to 650mA amps. If you need the unit to charge faster and your power system can handle that then it is adjustable up to an 900mA charge rate. The other dial is the system cut-off voltage. This is the lower voltage at which you would like the system to shut off at with the fault being set to 2.5 volts. The system does not need an upper voltage cut-off because it simply charges to the exact voltage you have your receiver system is running.
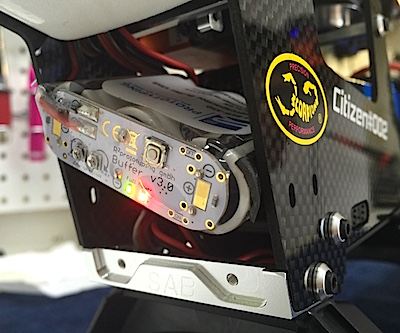
Mounting the unit is easy and double sided 3M tape works like a charm. It’s a little bit on the big side measuring in at 52mm x 45mm x 18mm but I’ve successfully fitted it in as small as my 500 class models without too much problem. Straight out of the box it’s extremely plug-and-play so all you need to do is simply plug the servo lead straight into your RX or spare port on your FBL system and you’re ready to go.
Now here comes one of two very important questions. First one… how do you know it has activated in flight and you’ve experienced receiver power failure? You don’t. Unless, that is, you have a telemetry capable radio system. What I did on my radio was set my receiver power telemetry alarm for 0.3v less than my BEC voltage. How did I come to that number? I used the telemetry in the radio and did as hard of flight as I possibly could being almost embarrassingly poor with my collective management. I then checked the minimum receiver voltage in the telemetry menu and set the alarm for 0.1v lower than that. My testing showed that within 2 seconds of losing receiver power my alarm was blaring and I immediately knew I was running off the Buffer Unit. In a situation of a receiver pack I would simply set my receiver voltage alarm to 7.4v as I rarely let my receiver packs get any lower than 3.8v per cell.
The second important question is how long will it last when my receiver system fails? This is a bit more of a complicated question so what I did was try to create some real world situations on the bench to give you a good grasp of it’s capabilities. For the first test I unplugged the main receiver power and began frantically wiggling both gimbals as fast as I could. This put me in an average current draw of 5A and the Futaba receiver shut down 35 seconds later. To be completely realistic this is a VERY unfair test because in no situation that I can image would you be doing anything like that in flight but I wanted to give you an extreme example.
In the second test I simulated normal sport flying, an autorotation, and just general smooth gimbal movement on both sticks with a light load on the head. This is a lot more realistic of how things would really go down. This yielded an average current draw of 1A and I was able to get 85 seconds before the unit shut down. So what does all this say? What is says is that in my personal opinion the Buffer Unit will allow me more than enough time to turn the model around and either fly it back in and quickly land, or my personal recommended action of auto rotating the model down to the ground.

If I had to pick the unit apart I’d say I only ran into a couple small quirks. First one was a super simple fix. I found the power off button difficult to push without hitting it with my fingernail. I simply took an exacto knife and carefully cut the shrink wrap off in a small circle around the button. Problem solved! Now I can shut it down simply by feeling for the button. Second is it can be a challenge to mount in smaller models. I’d say that 500 class is the minimum size I’d get it for and 550 and up models are a perfect fit. Lastly is you really do need to have a telemetry radio to properly alert yourself.
Now, on the plus side this thing absolutely rocks! It is hands down the cleanest and most simple back-up solution I’ve seen. Not needing to remember to power the unit up (me forget? what? lol) is a huge bonus and keeps me from having to create another habit of remembering to power it up. The other huge asset is that this unit does not have a battery. I have had other back up units fail due to their internal battery dropping a cell or bleed voltage down over time on the bench without me realizing it. This system needs zero maintenance and the less things I have to remember to maintain the better! Some other features that are really big added bonuses are that this unit will help prevent back EMF from your servos and also help stabilize current spikes from your BEC. This are huge features when it comes to getting the most life and performance out of your BEC.
R2 Prototyping has done an incredible job with the Buffer Unit and to me this one is a no-brainer for my fleet. It’s a low maintenance unit and at a retail cost of $49 it’s worth every penny in function. Thank you again to Danny for sending this unit over and a big congratulations to R2 Prototyping for building a great unit.
– Nick