
The Great ESC Shoot-Out!
Written by: Justin Pucci
Wow! This one has been a long time in the making, huh? So, why am I doing this? Well, the ESC market is still…developing. Yeah, we’ll say that… If you’ve ever looking into what ESC’s are available, you know that there aren’t many brands to choose from and each one has its pros and cons, fan boys, and haters. So, getting right down to it, I’m doing this review because I’v’e always wanted to do a comparison of the major ESC offerings out there and I’ve heard from tons of listeners that they’re interested too!
I know that a lot of you guys out there are running your new, fangled external governors on your iKon or V-Bar, but as you know, I fly for Bavarian Demon and unfortunately, that means that I don’t have a governor in my FBL controller. This ALSO means that I need to rely on the ESC internal governor offerings out there. This will be a primary focus of this review, as I’m out to find what I consider to be the best governor out there for me and my flying style!
Alright, let’s look at what ESC’s I’ll be reviewing and check out what categories I’ll be considering…

As far as categories go, I tried to choose a balanced set to consider, but obviously I’m going to be spending a good portion of my time talking about the governors. I’ll be scoring them numerical from one (best) to four (worst), such that the winner will have the lowest overall score. Here they are:
1. Ease of Setup – From the time you pull it out of the box until the first flight, how easy is it to go through the setup process?
2. Ease of Tuning – Once you’re in the air, how easy is it to tune the governor to that feel you’re looking for?
3. Governor Performance – Now that you’ve got it tuned, how does the governor perform under a variety of different flight and loading conditions?
4. Auto-Rotation Bailout – Ok, you’re done with your flight now, so let’s see how we do bailing out of a crazy aerobatic auto!
5. Overall – And the verdict is…?
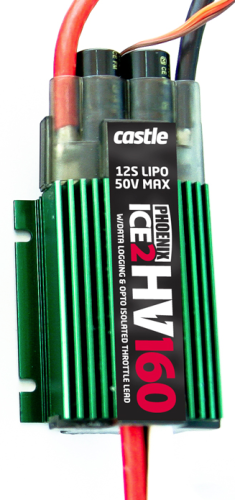
First up is the (in)famous Castle Creations Phoenix ICE2 160HV. This ESC is now discontinued due to the release of the Edge series of ESC’s, but it’s still supported via firmware updates and has the same capabilities as the Edge with the exception of the new auxiliary wire functions. So, as I talk about it, please keep in mind that my observations will apply to the Edge too!
The ICE2 is a beefy ESC with a large green heatsink and well-protected input capacitors and comes in at 210 grams without connectors installed. This actually puts it in the second-to-bottom spot in the weight arena. As a result though, the ESC itself is a very solid-feeling piece of equipment that you don’t feel like you’re going to break if you mishandle it, which is a good thing in my opinion. It is capable of operating on up to 12-cell lipos and boasts a maximum continuous current rating of 160A. It is opto-isolated and, as such, does not come with a BEC, so you’re going to need to get your own external BEC or run a receiver pack.
The ICE2 has a great auto-rotation bailout mode, multiple governor modes, and automatic motor timing along with a lot of other features that are accessible through its CastleLink software, but what’s the Castle’s real claim to fame? Data logging! If you’re a nerd like me, you’re going to love the awesome internal data logger that allows you to measure power output, current, voltage, voltage ripple, throttle position, pack capacity consumption, head speed, and ESC temperature at one of four different sample rates (1-10Hz) depending on what fidelity of data you’re looking for! 🙂
It’s newer version, the Edge series of controllers, supports external governor operation on governor-equipped flybarless systems, but the ICE2 does not. Finally, the ICE2 (and Edge) is the only one of the four ESC’s in this review that does not have active freewheeling. What does this mean? Let’s spend a few minutes getting up to speed…
Inside your ESC, there are a set of switches call field-effect transistors or FET’s that turn on and turn off to allow current to flow through each of the three phases of your motor. These FET’s stay on when you’re at 100% throttle, but when you set your throttle percentage to something less than 100%, they have to switch on and off many times per second to “chop up” the current into tiny chunks that can be added together to give you the lower throttle output that your transmitter is asking for…
In normal operation, when a pair of FET’s (called a bridge – there are three bridges with two switches per bridge) switch off to stop driving a phase of your motor, there is a “freewheeling” current that continues to circulate in that phase for small amount of time. This current is forced to flow through a diode that sits in parallel with the lower FET in that bridge. Since the diode has a voltage drop across it, heat is dissipated and it warms up. For example, if we’re pushing 60A at 50% throttle across a FET body diode whose forward voltage drop is 0.5V, then 15W is being dissipated in that tiny FET! Ouch…hot!
Now then, active freewheeling comes in when, instead of running at partial throttle through the FET body diodes, as one FET switches off, the “freewheeling” diode switches on to allow the “freewheeling” current to flow through it instead of it’s body diode. Since the resistance of the FET is much much lower than its body diode (usually around 5 milliohms), much less heat is dissipated. For comparison, if we take the same situation as above, but this time flow our 60A through the “freewheeling” FET, we get a total power dissipate of 4.5W! More than three times less than the non-active freewheeling ESC…
Ok, so if by this point, you’re lost, I’ll just feed you the punch line…ESC’s that are equipped with active freewheeling are able to operate over a wider range of throttle percentages due to the more efficient switching methodology that is used. This means that you can run lower head speeds without having to re-gear or worry about your ESC blowing up! Because the ICE2 doesn’t have active freewheeling, it can only run safely above the 55-65% throttle level, whereas the others can go as low as 30%.
Ok, enough super-nerd stuff, right? Let’s move on…
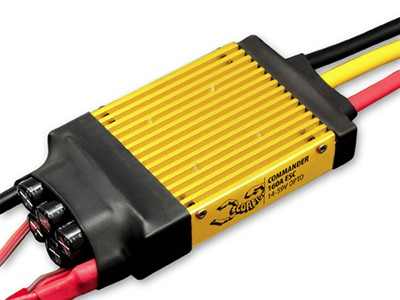
The next ESC is the Scorpion Commander 160HV. This ESC is the big brother in Scorpion’s line of HV ESC’s with the other models being 90A, 120A, and 130A units. Like the Castle, it has a very substantial feel to it and has a sexy gold heatsink that is capable of accepting an aftermarket cooling fan for those extra-crazy power setups. It’s the heaviest of the bunch at 256 grams though, so make sure you’re ready to do some CG optimization.
The Scorpion is 14-cell capable with a maximum continuous current of 160A, is opto-isolated, and supports external governors. Furthermore, it has an auto-rotation bailout mode and active freewheeling that allows you to run at throttle percentages between 30% and 95%. For most setups, this means you get a 300-500RPM range of head speeds all on the same gearing configuration. It is programmable via an infra-red controller, which isn’t all that reliable or convenient, or via software. I personally prefer using the software…
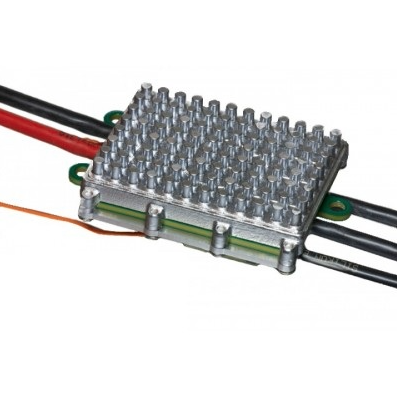
The YGE 160HV is #3 in the lineup and this is where things to change a bit…While the YGE is a 160A capable unit and can support up to 14-cell lipos, it looks and feels quite a bit more…minimalist. What you’ll see is that the YGE is nothing more than a few circuit boards and a heat sink sandwiched together and covered in clear, heavy-duty heat shrink. As a result, it comes in #2 on weight at only 156 grams without connectors! Wow! It’s actually quite a bit more robust than its appearance would suggest, but it’s not going to take as much of a beating as the Castle or the Scorpion. That’s for sure…
The YGE is programmable via stick commands and a pretty neat little programming card. It also has active freewheeling, auto-timing, and supports external governors. Finally it’s opto-isolated like the Castle and Scorpion, but it doesn’t have an auto-rotation bailout mode.
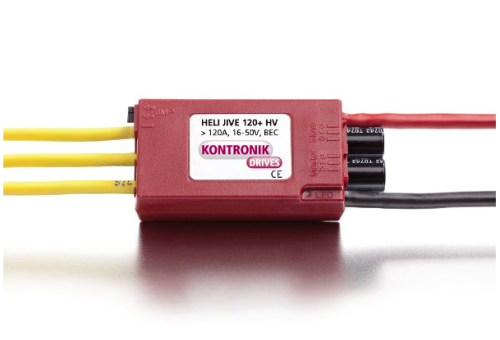
Our final contestant is the Kontronik HeliJive 120+. This ESC is the lightest and smallest of the four coming in at only 150 grams with the heat sink. While it doesn’t come with a heat sink, I strongly suggest that you buy one for a few extra bucks. The “120+” current designation means that it is capable of up to 120A continuously, but with a heat sink and adequate airflow, this increases to 160-180A depending on the conditions. The Kontronik is the only ESC of the bunch with an internal BEC that operates at 5V, 5.5V, or 6V and a continuous current up to 10A. It has an auto-rotation bailout, active freewheeling, and supports external governors and auto-timing. Programming is accomplished via stick commands or a series of aftermarket programming cards depending on what you want to do.
Ok, so now that we’ve got the formalities out of the way, let’s talk each of the specific categories…
1. Ease of Setup
Castle Creations ICE2 160HV – 2
I rated the ICE2 as #2 when it comes to ease of setup because, while it requires PC software to fully configure it for heli operation and there are a number of different options that you need set correctly before you’re ready to go, the tool tips and instructions are very clear and easy to follow if you just go slow. Once you’re in, you can choose between fixed end points (straight throttle curves), governor high/low, or set RPM modes and each one has their own quirks, which can make it challenging, but again…read the descriptions and if that doesn’t work, Google is your friend. Throttle calibration is accomplished by using the fixed end points mode and adjusting your transmitter throttle end points.
I personally prefer set RPM mode when I use the Castle governor because I’m able to choose my head speeds after inputing my motor, battery, and gearing information and then set my three idle-up throttle curve percentages at 30%, 70%, and 100%, so that all I need to do to tune the head speeds is use the CastleLink software. In my experience, the head speed accuracy is amazing in Set RPM mode…I tend to see that the tach gets to within 10RPM of the value that I chose in the software! If you’d rather just tune your head speeds from your radio, then go with Governor High or Governor Low and all you need to do is change your flat throttle curve percentages in your transmitter.
Scorpion Commander 160HV – 2
The Scorpion comes in tied with the Castle for #2 because, as long as you don’t have to fight with the IR programmer, everything goes pretty smoothly. You can and should use PC software, but the IR programmer is much better than it used to be and usually works great nowadays. Even so, ever so often, it doesn’t recognize the inputs that you send it, so you have to repeat them a few times before the settings take. Also, it seems to be a bit sensitive to lighting conditions. Throttle calibration only requires setting high and low throttle stick positions during initial programming using your transmitter.
Once you’re that far, you can set your preferred mode of operation (Heli – No Gov or Heli – Gov), your low-voltage cut-off level, and you’re ready to go. For governor mode, the first-startup procedure requires you to spool up in a 50% throttle curve with your pitch held at zero degrees for at least 15 seconds, then spool back down and unplug the unit before you can go fly. This “teaches” the ESC how to govern given the power system and blades that you’re running. If you change your motor, pinion, packs, or blades though, you’ll need to repeat this procedure.
Like the Castle Governor High/Low modes, the Scorpion head speeds are determined by the flat throttle curve percentages that you set in your transmitter. Remember, you’ve got active freewheeling on this one, so you can run from 30% to 95%!
YGE 160HV – 3
Sorry, YGE, but you get the bottom-of-the-pack award for ease of setup. The instructions that come with both the ESC and programming card are mediocre at best and quite frankly, you’re better off just going straight to the internet for this one. The programming card is a bit odd at first, but once you figure it out, you can move through the settings fairly rapidly. Still, you need to do a combo of stick and card programming to really get the thing up and running and I personally found this to be a pain… Like the Scorpion, throttle calibration is a simple high-low stick procedure. Maybe I’m just spoiled by the awesome Castle software?
To be clear, I’m rating this more on the manual than anything else, but I think this is fair because if you’re a noob and this is your first foray into big electrics, YGE doesn’t do you any favors…once you do decode the hidden message though, it becomes much easier. Ok, now that you’re through the basic setup, you can tune your head speeds with your TX throttle curves just like the Scorpion.
Kontronik HeliJive 120 – 1
Hmm. Anyone who’s ever flown a Kony knows why it’s at the top of my list for ease of setup. This thing is so simple to setup it’s ridiculous. Power it, unplug the programming jumper, follow the manual, listen for the beeps you need to get into your desired modes, and you’re good to go. Mode 4 is your standard heli governor mode and the one that I personally use when I’m running the Kony, but if you’re using multiple packs of varying qualities or cycle counts, then I suggest running mode 9 instead. This just compensates for the difference in pack performance to keep your head speed more consistent from flight to flight.
Throttle calibration doesn’t NEED to be done on the Kontronik, but I recommend it because otherwise your throttle percentages won’t match other people who have calibrated units. If you do decide to calibrate the throttle, the procedure is similar to the Castle with regard to using your transmitter endpoints. Like the Scorpion, the Kontronik requires doing a first spool-up to a zero-pitch 50% throttle curve to set the governor correctly, but once that’s done, you’re good to go! Now that you’re governor has been initialized, set your head speeds in your TX using throttle curve percentages.
2. Ease of Tuning
Castle Creations ICE2 160HV – 3
You’ve only got one parameter…governor gain. Move it up and down and see what happens. Of course, this is all done through the CastleLink PC software…or through the auxilliary wire if you’re running the ICE’s bigger, better brother, the Edge. The problem with tuning the Castle is that when you start to see bad behaviors such as a tail kick, shake, or wobble, it means that your gain is too high and there’s not much else you can do but to drop the gain a few points until it goes away. There are not expert tuning parameters and this means that you’re stuck with whatever you can squeeze out of the single gain parameter. Do yourself a favor and don’t fight it because you won’t win… If it’s not to your liking, just move on.
Scorpion Commander 160HV – 2
Your governor gain is tuned via two parameters. P-gain and I-gain. You can do this using the IR programmer or via the USB link software, which is my preference. The nice thing about the Scorpion is that its default gain values of 5 and 5 for P and I gains gives you a very stable, well-behaved albeit slightly soft governor setting. You don’t have to worry about chasing the performance right off the bat because the defaults can be flown with confidence. When you’re ready to kick it up a notch, start the climb up in gain values until you get that nice, crisp, and aggressive response you’re looking for. Hint: 700-sized helis tend to optimize around 8-10 on P-gain and 6-8 on I-gain. ALso, a good rule of thumb is to keep the P-gain anywhere from zero to two or three points above I-gain. Running with a P-gain value below the I-gain usually doesn’t result in good performance.
YGE 160HV – 2
In order to tune the YGE governor, you’ve got to plug in your programming card and choose from a small list of discrete P- and I-gain values, but again, once you figure out the card, it goes fast. The YGE really tunes about as easily as the Scorpion if you understand what the P and I gains do for you. Don’t worry about only have a limited number of gain settings to choose from…you should easily find a combination that allows for awesome performance. On all of my 700’s I’ve found that I’ve gotten the best performance at a P-gain of 0.7 or 0.9 and an I-gain of 0.03 or 0.05.
Kontronik HeliJive 120 – 1
Tuning-wut?! Yeah, not needed for 99% of all pilots out there. Just set the damned thing up and fly… It’s as simple as that! The most you’ll need to do is go into Kontronik Special Applications (KSA) mode to run some of the bigger motors.
3. Governor Performance
Castle Creations ICE2 160HV – 4
Let’s face it, the Castle governor is just…well, good-ish, I guess. Now, to be fair, it’s WAAAAAY better than it used to be, but for those of you who want to fly hard and at high head speeds, you’ll likely have a challenge getting to a high enough gain to feel like it’s holding well without getting the dreaded Castle governor tail wag or kick. I will say that at head speeds below around 1800-1900 and with smooth flying, it’s not too bad, but it still requires getting used to.
Why? Well, it doesn’t hold RPM all that well on unloaded-to-loaded transitions. This can be felt as a 100-150RPM drop in head speed on hard loading, which causes the heli to sink below where you want it to stop unless you are REALLY good at adjusting your collective timing and throws. This basically means that you have to reprogram your brain to account for the power lag that you get on loading the Castle. On the high side of the set point, it over-runs by 25-50RPM when tuned correctly, which isn’t too bad actually.
I’ve personally found that it feels great when I’m flying slow and smooth, but when I want to pop it a bit, it really starts to suffer. If you’re doing flying that doesn’t make a lot of large and fast load changes (i.e. sport, big-air, smooth 3D, speed), then you’ll probably get along just fine with the Castle, but don’t bother if you’re main routine is smackaliciously hardcore. 😉
Scorpion Commander 160HV – 2
The Scorpion governor gives you the opportunity to experience the largest range of governing feels of any of this group. This is because you’re able to tune the P- and I-gains independently over a range of 1 to as high as 11 on the P-gain and up to 8 on the I-gain. This allows you to have a very docile feel that flows smoothly to a very aggressive hardcore smack feel with little or no discernable over- or under-shoot. You do have to be careful with tuning the P-gain too high though especially on higher tail gear ratios (above about 4.5:1 and with bigger tail blades) because this governor can respond so rapidly that it will have your tail going all over the place.
As I mentioned before, the default settings of 5 and 5 are really quite good for sport, mild big air, and a bit of mild 3D. If you want more aggressive 3D settings, then get your P-gain up to around 8 or 9 and your I-gain around 6 0r 7 and then you’ll start to see it come alive. At these more aggressive settings, the Scorpion holds head speed harder and better than I’ve ever experienced on any electric. Very impressive! Now, while I’ve never actually used a data logger on my Scorpion ESC’s, I can tell you from feel alone and comparison back to the other ESC’s that I have had data for, that it can govern so aggressively at those higher gains that I’d bet it doesn’t go past 10-20RPM on over- or under-shoots. Now THAT’S solid, eh?!
YGE 160HV – 1
Here’s the deal, ONCE you tune it to the optimum gains for your setup, it’s performance is almost indistinguishable from the Kontronik, but you’ve got to get there first… Luckily, since you don’t have a shload of gain values to choose from, it’s actually quite simple once you get the hang of it. What you’re going to find is that if you want to use this ESC for a broad range of head speeds (active freewheeling, remember?), that you’re likely going to have to do a bit more tuning to find a happy medium for your prefer speed range. Still, it’s not that bad and since the governor algorithm on the YGE is so similar in feel to the Kontronik, it’s hard not to like it.
Why so little to say? Well, move to the Kontronik’s description because, as I said, the YGE feels pretty much the same when properly tuned…
Kontronik HeliJive 120 – 1
The Kony…oh the Kony. My first real love…in helis that is. This ESC contains within it’s diminutive rubbery shell what I believ to be the quintessential electric governor. A governor that all other governors strive to emulate, but most governors don’t come close to. This baby has little to no under-shoot under high-load conditions, but it applies the power on unloaded-to-loaded transitions in such a way that it feels smooth as hell! On the high end, iti allows for a pretty substantial overspeed. Just do a wall to find out… 😉 This all comes together to provide the user with a power delivery that has a very smooth and almost nitro-like feel to it. It feels comfortable, predictable, and still very powerful. It ALWAYS seems to respond in the right way to whatever you can throw at it and it never causes any weird or disconcerting tail issues.
It’s hard to find that feeling again when you finally decide to move away from Kontronik. Remember that if you’re going to run some of the bigger and more powerful motors, you should use the KSA mode…without KSA, I’ve experienced higher motor temperatures and heard of others getting subtly erradic governor behavior. While I’ve never experienced it myself, I have heard that people have actually had their ESC blow up while running larger motors without KSA mode. Yes, Kontroniks aren’t perfect and have blown up just like the rest of them…just ask Nick!
4. Auto-Bailout
Castle Creations ICE2 160HV – 1
The Castle bailout was my first experience with electric bailouts and I must say that it’s still my favorite. It’s easy to setup and adjust and it just works. There’s no timer so you don’t have to worry about the ESC reverting back to slow spool-up mode. To get it working, choose autorotation bailout and then re-calibrate your transmitter lower endpoint per the instructions. Once this is done, you can tune your throttle hold position such that the motor just barely spools up, then drop it down one point. Once you get it set, you can adjust the spool-up rate in the software from soft to pretty aggressive. Still, its not so aggressive that it’s going to kick the tail out or scare you, so you should have no anxiety when giving it a first real try in the air.
Scorpion Commander 160HV – 1
The Scorpion bailout has evolved a bit over the last few years. It used to be a timed bailout that would allow you to choose between 15, 25, and 35 seconds duration, but the most recent update made it a pure throttle hold percentage bailout with no timer. The setup is even easier than the Castle…all you need to do is set your throttle hold percentage per the manual’s suggestion and you’re off and running. As for performance, I must warn you that the bailout on the Scorpion is REALLY aggressive. When you’re bailing out with significant head speed margin, it’s no big deal, but I’ve actually bailed out when I can see individual blades and the tail has kicked around by as much as 180 degrees, so play with it a bit to get comfortable before doing any thing crazy.
YGE 160HV – 4
Poor YGE. Another “bottom of the pack?” Yeah, well in this case, it’s not because it doesn’t perform well. It’s because it doesn’t have a bailout at all…
Kontronik HeliJive 120 – 2
The Kontronik bailout is a relatively new addition to the line of Jive ESC’s. Up until a couple of years ago, you weren’t able to bailout at all, but Kontronik listened to its fans and released the HeliJive, which has a bailout function. The upcoming Jive Pro’s will also have a bailout on them that I suspect will be similar to the HeliJive that they will replace.
Ok, after saying all of that…I don’t really like it. I’m being kind of picky here, but I’m a paying customer just like everyone else, so I think I’m allowed to be picky. The default spool-up rate is slow in comparison to the other ESC’s and if I want to adjust it, I need to spend a bunch of money on a programming card. Strike one…
Next, we’re dealing with a time on this one…and guess what? It’s a pretty short timer! If you decide to bail, you better be ready to pop back out of throttle hold within 12 seconds of your initial auto attempt or else the ESC will revert back to soft start. Strike two…
So, as I was saying above, I’m just not too hot on the Kony’s bailout. Perhaps I just need to tweak around with the settings, but I don’t have the rather expensive ProgDisk programmer and I don’t really think I should need that to tune something this simple. In all fairness to Kontronik though, it’s bailout function works as advertised and whether this is your first bailout or not, you’ll get used to the differences and adjust accordingly.
5. Overall
Ok, so that’s it. What does it all mean? Well, before I unveil the final scores, I want to remind everyone that these are all my opinions and I’m quite certain that they’re not shared by everyone who’s flown these ESC’s, but that’s what’s nice about this kind of review, right? Again, to get my final scores, I took the score for each ESC in each category and added them up. Lowest score wins…
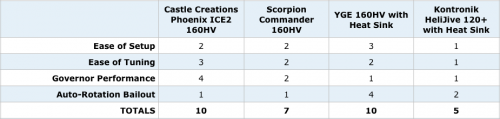
I guess it’s not surprising that the Kontronik won, but I was surprised to see that the YGE came in tied for last with the Castle. In fairness to the YGE though, the lack of bailout isn’t the same “bad” score as last place for governor performance. If you got rid of the bailout as a factor in your decision-making process though, you’d get the YGE tied with the Scorpion and just behind the Kontronik with the Castle bringing up the rear.
Now, what if we consider that these would be used for external governing? How does that affect the score? Well, that’s when it becomes a lot more personal of a choice. If you eliminate the internal governor, then you eliminate the ease of tuning and governor performance categories. All of a sudden, everyone is tied…well, except for the poor YGE because of it’s lack of bailout. Nevertheless, you now have to start considering other stuff like weight, price, and reliability (whether perceived or real). For weight, the Kontronik can’t be beat at only 150 grams with a heat sink, but damn that price tag stings! On the other hand, the Castle is the king of the affordability category at a mere $275, but tops the scales at 210 grams! Is a BEC an important feature to you? Well, then you’re stuck with the Kontronik, so get out that credit card and let’s hope your wife doesn’t see next month’s statement! 😉
So, what’s most important to you? How would you rate these ESC’s based on your personal experience? Maybe the internal governor argument is a relatively easy one to make, but the external governor clouds things, doesn’t it?
Thank you for being so patient with me on this review and I hope that it provides you with some food for thought whether you agree with my conclusions or not. I’m always interested in hearing from others regarding their thoughts on debates such as these, so feel free to leave a comment, hop on our forums, or toss me an email at .
– Justin