iKON Flybarless Controller Review
Written by Jessie Salmonson
A huge thanks to iKON and Helidirect for giving me the opportunity to get my hands on the brand new iKON fllybarless unit. This unit just hit the market in October so it is very new, which makes it a mystery unit to most…not knowing all that it has to offer. In the following review, I am going to remove all that mystery and show you guys the ups and downs of this unit as well as talk about everything it has to offer.
Features
The iKON really does have a lot to offer when you start looking at all of the features that they’ve packed in to this unit. To name a few, you have an electric governor, a self-level/bailout, bank switching and the list goes on. Now, not every person is going to be able to take advantage of all these features, but the cool part is they will be there when you finally do want to use them.
My first impression of the unit was very good right from the minute I opened the box. In the box is everything you would expect to find: a couple of jumper servo leads, mounting pads, and lastly a USB cable so you can connect it to your computer. Unlike most flybarless units that come with very thick foam mounting pads that are complete garbage, the iKON comes with two pre-cut pieces of clear 3M mounting tape, which is a huge plus. This has been my go-to mounting tape for all flybarless units.
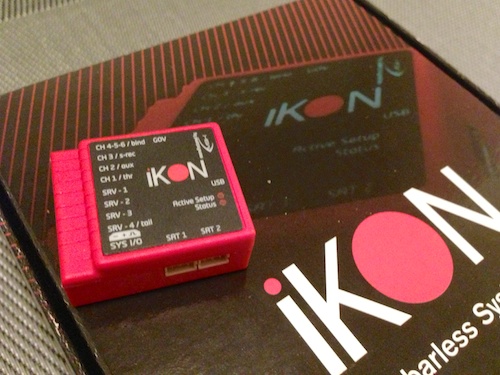
First, I want to talk about the unit itself in terms of its physical features. Coming from a Mini V-Bar, the first thing I noticed is all of the ports this unit has on it. The iKON has eight ports to plug in servo leads, two ports where you can plug in Specktrum DSMX or DSM2 satellites, and one port where you can plug in an RPM sensor for the internal governor. The external case of this unit is plastic, which isn’t a problem in my eyes since I am used to the V-Bar, but I know this may be a hang-up for some.
As far as the locations of the ports, this could be troublesome for some people. This is because the USB connection is on the opposite side of where you connect all of the servo leads. What this means is that you need to be able to access the front and back of this unit in order to wire it up and program it. On some smaller helis, I know this could be a challenge, so this is definitely something to keep in mind when considering the iKON. The last thing you will notice when looking at the iKON is that on the top there are two small lights. One of these is used to tell you when the iKON is active and ready to fly and the other is used to tell you the iKON is connected to the computer and is in programming mode.
Next, I would like to talk about the software that you use to program the iKON. In my opinion, the software is the one thing that is holding this unit back. The software includes a wizard that will take you through each step of the setup. The only problem is that some steps can be a little confusing and this is coming from someone who has setup dozens of flybarless units. So, when setting up your heli, be sure to read all of the directions very carefully, as it can be very easy to miss a minor detail which will have a huge effect on your setup.
I should add that there is no instruction manual for their FBL unit. All of the needed directions are integrated right in to the wizard and are displayed on the side column during each step of setup. Once again I feel this is a great idea, but the directions need to be more clear on a couple things, which would make the setup go much faster and smoother.
The feature list continues with bank switching. This is actually a very cool feature and one that I was very excited to try. Coming from a V-Bar I never had the option to use bank switching since I chose to control my tail gain from the transmitter, and in the V-Bar it is one or the other… Not the case with the iKON. The iKON allows you to control the tail gain from your transmitter as well as program bank switching to a three-position switch so you can change banks during your flight.
The iKON offers three different banks which can be as similar or different as you choose. In each bank you have the ability to activate self-level, as well as the internal governor. You can also control all of the normal things as well like main gain, tail gain, etc. Using bank switching really gave me the ability to get this unit tuned very quickly, as I could try three different head gains each flight all with the flip of a switch.
I know many of you are very interested in the self-level and bailout feature that the iKON offers. I have to start by saying that I never thought a bailout feature would be something I would use, but I have to admit I was wrong. To activate the bailout, you need to use bank switching. For example, in Bank 1 you will not have self-level enabled, as this will be you main bank that you fly. Then, on Bank 2 you will select the option to activate self-level. What this will do is every time you switch from Bank 1 to Bank 2, the heli will snap to a level, upright position. Yes, upright every time. This means even when you are inverted, the iKON will flip the heli over and put it in a stable, upright hover.
There are a couple things I should say about the bailout. Although it may flip the heli upright, you still have no idea which direction the nose is going to be facing, so you want to make sure you are very comfortable with all you upright orientations before bailing out while inverted. Secondly, the iKON does not take control of collective pitch meaning when you bailout inverted you need to apply positive pitch. But for me this isn’t that big of a deal because it always bailout upright, so 10 times out of 10, positive pitch will get you away from the ground.
Although the bailout and self-level are all the same thing in the iKON, I really do feel that using the self-level mode for training purposes is a feature of its own. With the self-level enabled, it really does make any heli like flying a coaxial heli. With self-level activated, there are many settings you can control to make the heli return to level faster and even the vary the angle to which you allow the heli to tilt. For example, I can setup the self-level so it will only allow the heli to rotate a maximum of 45 degrees from horizontal.
What this means is even if on the transmitter you give full forward elevator, the heli will only tip 45 degrees forward making it impossible for the heli to go inverted. Then, as soon as you center the cyclic stick on the transmitter, the heli snaps back to the set level position just like a coax. In my opinion, this is an invaluable training tool that people can use when they are just learning. I feel it can remove a lot of the stress since, if you just let the cyclic stick center, the heli will basically self-level.
The iKON has a built in electric and nitro governor making it applicable on nearly any heli. This internal governor is very tunable…much like a Castle governor. You start by entering in all of your gearing information so the iKON knows what it’s dealing with. Then from here, it is as simple as typing in your target head speeds for the three flight modes that the iKON offers. The last thing you need to do is make sure that you have the correct flat throttle curves to enable you to switch between head speeds in the iKON.
Once set up, the governor is very tunable giving numerous options to tweak and tune its performance. You have the option to change I and P gains as well as cyclic and pitch gains, giving you the ability to tune the governor for your specific flying style. Another thing I really like is that you can control the ramp up speed or how fast the heli spools up. This comes in handy when you are using an ESC that does not have a good soft start.

iKON installed on my 7HV
Installation
As stated above, this unit has lots of ports on it making the installation a breeze. There is plenty of room to plug in everything you need including a redundant power source (very important, in my opinion). Once thing I should point out is the style of port used for the RPM sensor. This is not your typical servo lead port. The port where you plug in the RPM sensor is actually the same as a Spektrum satellite port. So in my application since I was using a Hobby Wing Phase Sensor I needed to make an adapter to go from the servo lead to a Spektrum satellite plug.
One last thing to add is this unit does NOT have any protection from plugging the servo connectors in backwards, if you do plug them in backwards you will damage the unit. So be sure you double-check that you have the direction right before you power on the unit. I had the iKON all wired up in no time and was ready to move on to programming.
Programming
The first thing you will need to do is head to the iKON website and download the software for your windows computer (note “Windows Computer”, there is no Mac support). Once installed, getting the iKON to connect to the computer can be a little tricky, since everything needs to be followed in a specific order. To get it to connect, you first need to plug in the USB connector in to your computer, then connect the other end the iKON. Then you are going to need to power on the unit. Once the iKON is powered on, launch the computer software and select the port to which the unit is connected.
In my opinion all of the flybarless systems are becoming very similar to program and the iKON is no exception. The included wizard is very helpful and takes you through each step of the setup. There may be a couple steps that are not so intuitive, so it is very important to carefully read all of the directions on each tab of the wizard. I would like to hit on a couple of the steps that I found slightly confusing.
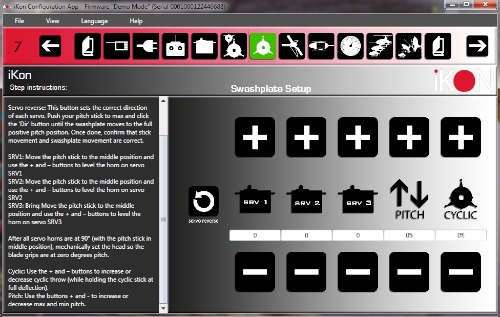
Swashplate Setup tab
The first one is the Swashplate Setup Tab. In this tab, you will set the direction of the cyclic functions, make sure the servo horns on each cyclic servos is at a perfect 90 degrees, and set the maximum collective and cyclic pitches. The order I listed them in is the order you want to do them. The first thing you will notice is the reverse button on the left. Use this button to reverse the direction of each servo. One thing to note is that there are a bunch of preset combinations for which servos are reversed and which are not. So you keep pressing the reverse button until you find that all of your servos are working together in the correct way. Then reverse the function in the transmitter if necessary.
The last thing on this tab that some may find confusing is setting the cyclic travel. The directions do not say how much cyclic travel you are supposed to set or if we are setting the maximum travel mechanically available so the unit knows the limits. I am still not sure what the correct answer is to this, so I left this at 50% and it worked fine for me.
I would like to briefly mention the last tab which is the Flying Style Setup Tab. Here you can visually see the three banks and the settings that go with each. It is nice because you can adjust any of the banks even if it’s not the active one. This is the place where you will activate the self-level or governor for certain banks and deactivate it for others.
Once you go all the way through the wizard you may be left thinking “That’s it? How am I supposed to tune this thing?” Well don’t worry! If you head up to View > Advanced, you will find a whole list of tunable parameters nicely organized into their respective categories. This is a very important feature that is a must-have on any top end flybarless system. I’m not going to go through every detail of all the tunable parameters but I’ll hit on a couple things that I feel are important.
First, I like how the parameters are organized. You can choose to edit things that are common to all of the banks such as servos, receiver type, etc. Then, up top you will notice you can select a bank and edit all of the parameters that are specific to that bank. Another very helpful feature is the ability to copy banks so you don’t have to go through and manually enter all the settings on Bank 2. You can simply just copy Bank 1 to Bank 2. I found this useful when setting up the bailout feature, as I wanted all of the settings the same except for the bailout. To do this, I copied Bank 1 to Bank 2 then just activated the bailout on Bank 2 and I was good to go.
Flying the iKON
Flight Performance
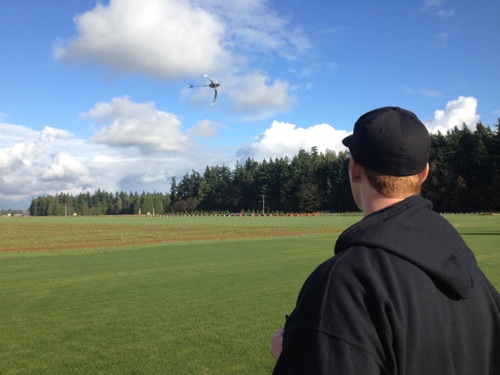
Finally the part everyone has been waiting for. Overall I found this unit to be very fool-proof…even when trying a variety of settings, the iKON performed very well and had very few negative tendencies. The first flight was very uneventful, which is good. Since this was a brand new unit and I had no idea where to start, I left all the gains stock.
What I found was the heli had a little bit of a head shake when it was in a hover, so I quickly landed and turned down the head gain…problem solved. Once tuned, the iKON was a very solid unit, it had a very “locked in” feel to it. What I mean by this is the heli had no bobbles and it only did what I told it to do. In general, the heli had a very connected and smooth feel to it. There were no weird interactions between the cyclic and the tail either.
Here’s my setup so you have an idea of what i’m flying:
Cyclic servos – Futaba BLS 451
Tail servo – Futaba BLS 251
ESC – Hobbywing 120A
Motor – Scorpion 4525-520kv Limited Edition
Batteres – Gens Ace 5300 30C lipos
Blades – Regular flybarred Radix 710’s
Power source – 2s Life pack
Now that you know my setup, I will go in to more detail about some specific categories of performance.
Cyclic Performance
I was pleasantly surprised to find how easy this unit was to tune. With other flybarless units I have struggled to get every last cyclic bobble tuned out, but that was not the case at all with the iKON. The range of head gains over which the unit performed well was quite large, making it very easy to set the head gain and go fly. The cyclic is very locked in making the heli very stable. Yet on the other hand it is very fluent and flows nicely, which was evident in piro flips and other stirring maneuvers. As you can see in the picture, the cyclic is very tunable, giving you tons of control over the behavior of the heli. For me, I like a very high head gain so the heli has a very rigid feel to it. No matter what your flying style is, the iKON can be tuned to meet you needs.
Tail Performance
In my opinion, the tail performance can make or break a flybarless unit. This is because many of the maneuvers that I do involve quite a bit of collective pitch while giving rudder inputs. I can say that I am very pleased with the iKON in this category. No matter how hard I pushed it, the piro consistency stays perfect, which is a must if you want to get your timing nailed down on difficult moves. Since I have the Futaba 8FG, it only took me one flight to find the optimal tail gain since I can adjust it right in real-time.
I found the iKON tail in general to have a very precise, smooth feeling to it. The acceleration is such that the tail feels quick but not too fast to where you are overshooting. As you can see in the picture, there are quite a few parameters that you can tune for tail. I would like to mention one setting and that is Tail Asymmetry. You use this setting to set the stops for the tail. What this does is you are basing your piro stop gain for left rudder off of the piro stop gain for right rudder. You do this by using the slider to set that ratio for the stop gains.
Governor Performance
This is one section of performance with which I had no prior experience. Most of this was due to the fact that I was flying a Kontronik HeliJive on my 7HV before so I felt no need to try the V-Bar governor. Overall, the governor performed great and held head speed very well. In my opinion, it held head speed as well as my Kontronik did, if not a little better. In the end, the governor worked great but it did take a little tweaking to get it to perform well.
On the first flight, the head speed was about 200 RPM lower than the value I had set in the software, which made me very concerned, as there isn’t much to change as far as setting up the governor. I ended up having to raise my I and P gain and this raised the head speed up to the desired RPM. This leads me to one other minor thing I found. No matter how much I messed with the governor gains I could not get the RPM to stay constant for the whole flight. The best I could get it was a 40 RPM drop in the governed head speed from the beginning to the end of every flight.
In general, I found that once you got the I and P gains high enough to where the heli reached the proper governed head speed, the gains didn’t have that great of an effect on the performance. In my case, running the gains at 85 or 100 showed little to no difference. I never was able to get the governor to over-gain and show governor chatter. This is a curse and a blessing. On one hand, it was very easy to set the gain on a 700-sized heli and have great performance without negative symptoms, but in some situations this may be bad because I question how tunable the governor is on other sized machines. This is just a thought as I have no experience with the unit on a different sized heli…yet.
My final thoughts on the governor performance are simple: it works and it works well. I can confidently say it holds head speed as good as my Kontronik and for a lot less money. With my flying style, there are a couple maneuvers that I can do that will cause the Kontronik governor to over-speed, but with the iKON, I noticed there was very minimal over-speeding.
Bailout/Self-Level Performance
This is where things start to get exciting, as this is a fairly new feature that not many other systems have. I really had no idea what to expect, as I have no background experience with this technology, so I just went for it. I took the heli up a couple of mistakes high and put it in to a huge tail slide. When I was about 60 feet off the ground, I flipped the bailout switch. The iKON self-leveled itself so fast that I literally jumped. Once I got comfortable with the speed and how the bailout worked, I realized how big of a life saver this feature could be.
The bailout does exactly what it is advertised to do. I am very pleased with the iKON’s performance in this area. The bailout is very simple to setup and it just works. It is very quick to get the heli in a level, upright orientation. Now to touch on the self-level mode…I did a couple of flights where I left the heli in this self-level mode the whole entire flight…even on take off and landing. I am really excited about how this works and the potential learning tool this can be for beginners. With a little tuning, I had the heli limited to 55 degrees of tilt making it impossible to flip the heli inverted. There is not much to say about this mode except it can make any flybarless heli as easy to fly as a coax.
So how does it compare to other units?
As most of you know the majority of my flying has been on either a BeastX or a V-Bar, so these are the units I will be directly comparing to the iKON. I will start off with the BeastX. In my opinion, the iKON is way ahead of the BeastX in terms of flying characteristics and the features it offers. Please don’t think I am saying the BeastX is a bad unit. It has its place, It is easy to setup and will fly great right our of the box, which is great for anyone who wants to keep it simple of for those just getting started with flybarless. Once you advance enough to the point where you want more features though, I feel the iKON is a great next choice.
Now for the big one, comparing it to my V-Bars. In the end, in my mind I now consider these units to be…wait for it…equal! In terms of the software used for programming, the V-Bar is the clear winner, but looking at the flight performance and features, the decision becomes much more difficult. When comparing the performance in terms of cyclic and tail I would say these units are so close it is hard to even tell them apart when flying them. They both give you a very precise locked in feel, and are very tunable for all flying styles. Both can be tuned to the point where there are no negative tendencies. For people who fly harder then me, this argument may not be true, but this is what I found.
Now, when it comes to features I have to say the iKON is the winner for me. It has an internal governor, which is easy to wire since there are so many ports on the unit…not the case with the Mini V-Bar. Due to this I have never even used the internal governor on the Mini V-Bar since it is not worth the wiring disaster this creates. The final thing is the bailout. There is no competition, as the V-Bar does not have a similar feature. When you combine all of this with the significantly lower price of the iKON, in my opinion, the iKON comes out equal if not slightly ahead of the V-Bar.
Conclusion
This was a great experience and an even better opportunity to fly a brand new unit that not many people know all that much about. In my review, I really tried to focus on the main features this unit has to offer. If there is a section or feature that you would like more information on, please don’t hesitate to email me. I would be more than willing to go in to as much detail as you need.
To sum things up, this is a great all-around unit and for the price I feel that it can not be beat. I would recommend this unit for anyone. The iKON is priced at $224.99, which is very reasonable considering all of the features you are getting and how well they work. I can say one thing for sure: the iKON will be staying on at least one heli in my fleet and may even find itself on a couple more.
– Jessie