
Revolectrix Dual Powerlab Review
by Nick Lenn
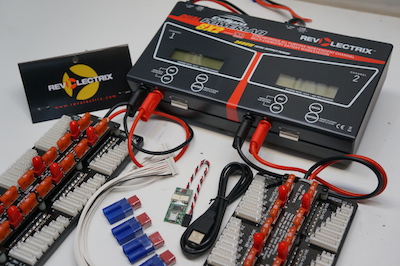
A charger is a charger is a charger, right? I mean, in the end, it’s all just about what they look like and how many amps they put out, right? That’s the impression I was under for a long time, but boy did I recently get an education in the charging world. We were fortunate enough to receive the Revolectrix Dual Powerlab charger with a pair of MPA parallel boards to review from FMA Direct. A huge thanks goes out to Jamie at FMA Direct for sending us this charger to review. I’ve always been very intrigued with the Powerlab line of chargers due to their reputation of quality, but I knew little about them. After having a bit of trouble with my other chargers, I figured this was the perfect time to give the Dual Powerlab a shot. So, thanks again Jamie for supplying us with the charger and also a huge thanks goes out to Greg Campbell for helping with product support and answering any of my questions I had during the review.
First thing is first: we should get some specifications out of the way. Here are the specs of the charger itself…
Per-Channel Specifications:
- Battery types: Lithium Polymer (1s to 8s balanced, 1s to 2s unbalanced), Lithium Ion (1s to 8s balanced, 1s to 2s unbalanced), Lithium Manganese (1s to 8s balanced, 1s to 2s unbalanced), A123 (LiFePO4) (1s to 8s balanced, 1s to 9s unbalanced), NiCd (1s to 21s), NiMH (1s to 21s), 6v, 12v, 24v Lead Acid batteries (Flooded, Gel, AGM, SLA)
- Input Voltage: Each channel may be operated on separate power supplies using 110V/15A isolated circuits for best results. Additionally both channels may be operated on one power supply provided packs on each channel are isolated.
- Pack capacity: 20 mAh to 360Ah
- Input voltage: 10-48VDC, reverse polarity protected
- Input current: 1A to 40A, software limited
- Power conversion: Synchronous DC/DC converter, supports multiple switcher frequencies of 31.25 kHz, 62.5 kHz, 125 kHz; user selectable by preset, 85% to 93% efficiency depending on output current
- Output battery charge current: Adjustable range 10mA to 40A, limited by 40A input current*
- Output battery discharge current: Internal discharge 10mA to 10A, 95W max Regenerative discharge 10mA to 40A, 1344W max**
- Continuous max output power: 408W @ +12VDC input, 1344W @ +39.53VDC
- Cell balancing: Resolution 78uV (16 bit) for 1s-8s Li or A123 (LiFePO4) balanced charging
- Voltage calibration: Cell voltage measurements are factory calibrated to a standard traceable to NIST; calibration is to +/- 6 mV
- Current calibration: Charge current is factory calibrated on a 4A standard; calibration is to +/- 1mA
- Size: 10.24 in. (260mm) L x 5.55 in. (141mm) W x 3.08 in. (77mm) H
Besides the obvious massive charging capability of 40A per channel, (AWESOME!!) the only thing that jumped out at me was the input voltage requirements. There’s no question this charger is much better off on 48v than on 24v. At first, that might seem like a downfall, but personally I don’t look at it this way. Having a higher input voltage helps prevent buck-boosting problems from generators. Ever been charging a 6s pack and your generator flips out and starts cycling up and down? That’s exactly what I’m talking about. If you run the charger at 36v you’ll be able to get super close to the max output and at 24v you’d be able to get about 36A per channel. To max out charging 6s packs, 28v is the minimum.
Well, lets tear into this thing and see what it’s all about! Included in the box is the charger… LOL I know that sounds kinda funny and is a given but honestly that’s all that’s included in the box. The way they’ve decided to sell these units is sort of with a “separate everything” approach. The combos of parallel boards, charge leads, etc. is up to the retailers to put together. If you’ve already got a charging setup, then this isn’t a big deal, but if this is your first large charger purchase and you need all of the smaller things, then you should be aware of this. While I understand them wanting to separate everything so you can purchase exactly what you need, I’m not sure I personally agree with that. Every other charger I’ve purchased has come with some sort of charge leads, balance board, and USB hookup with it and I have to admit I’d rather this one be the same for cost reasons.

In the case of our review, our setup came with two of the MPA parallel boards. These things are sweet! They’ve got a total of six main charge ports and balance connections all the way up to 8s. Heck, they’ve even got connections for 1s batteries! Those features alone would be impressive enough for me, but what sets these boards apart from others is their safety. All the balance connections and main charge ports are fused for you and your pack’s safety. If you’ve ever plugged something in backwards or melted a balance connection from not paying attention like I have, then you know exactly how nice of a feature this is. LiPo batteries need to be handled with care and anytime we can implement more safety features into our charging setups, I’m all for it.
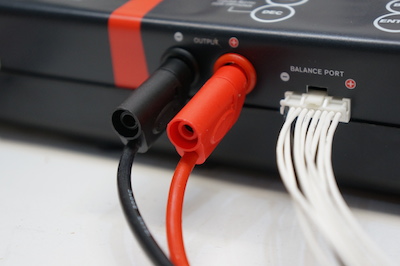
The boards we received have a Deans connector for the main output. At first, I was a bit concerned about that because I don’t use Deans connectors personally, but I was pleased to find out that they also have adapters that go straight to EC5 connectors available for purchase. What I ended up doing was making some Deans-to-EC5 extensions about 4″ long in addition to getting the stock adapters. This allowed me to reach the EC5’s on my stick packs with ease because you won’t be able to reach connections on a stick-pack with just the board itself. This worked out quite well and sent me into a frenzy of making numerous extensions/adapters for all kinds of connections including servos, EC3’s, and every connector I could possibly need. I found having these smaller 4″ long adapters was a lot more convenient than having a pile of 12″ charge leads for all my batteries because I could leave them plugged into the back two charge ports all the time.
Another really neat feature of the MPA boards are the main input leads that plug into the charger. They have the ability to plug in an additional set of charge leads into the back of them without unplugging the MPA board. This is a REALLY cool feature that simply adds to the theme of this setup giving you all sorts of options in a convenient package.
I think the only downfall of the MPA boards is due to the safety features of the fuses and fused balance ports…it inevitably makes the boards a bit larger than normal. I don’t think these would be easily mounted inside a charging case and still give you enough room to set batteries next to them. They’d be best stored in the case and then removed and set next to it for use. Past that, I think they’re great and I’d rather deal with the larger MPA boards than a set of smoked balance leads any day.
For the charger itself, it’s clean and simple. Once you’ve got it in your hands it’s clear this really is two separate chargers in one box. It’s a tad bigger than most dual chargers but as far as charging cases go, it’s not going to affect whether it will fit in a case or not. The displays are simple and traditional. definitely no color and no frills or extras. While this doesn’t really affect function in anyway, it’s hard to deny that the cool displays that other chargers have are a lot more visually appealing.
I wired the Dual Powerlab up to a 36v power supply setup that I had previously used and fired it up. It was pretty easily noticed that the menu layout was a lot different from standard chargers. Rather than have a menu system laid out around battery chemistry, this is laid out around presets. Each of the library presets isn’t just a different charge rate or battery chemisty, but an entirely different charge algorithm. This makes each preset far more powerful than what is seen on the outside.
Each time you switch presets, you’re completely changing the way the charger looks at and handles that battery’s charging. This equates to very simple and powerful charging using just the library presets that come with the charger. If you’re not into PC interfaces and want something super simple, then this gives you just that. The library presets are tailored around just about every charge instance you could need from high power charger to slower and more accurate charging. They really do a great job covering all aspects with the library presets and if all you ever did was use the charger like this, then I think you’d be very happy with it’s simplicity and power.
At this point I was sufficiently impressed with the charger but not blown away by any means. It was a very powerful charger with a very user friendly interface that was simple, but not overly ground breaking. Then comes along this little gem of a USB interface. The drivers and software easily installed in Windows7 and I was up and running in minutes. Wow! Talk about a whole new world. Here before me was an incredibly powerful program with about every option one could imagine.

I immediately jumped over to the Supply tab and got my specs put in for my power supplies. This is extremely important as the charger has the option to be taught whether you’re running on power supplies or a battery. You can set your low voltage cut-off for both and even set what kind of battery you’re running the charger off of…
A quick side note when it comes to power supplies: in the situation where a single power supply in a chain of supplies dies, this can cause a massive current spike and is one of the leading causes of charger failures. The Dual Powerlab is one of safest chargers out there in this situation because rather than try to hold on to the current charge and deal with the current spike, it will sense that rapid change of input current/voltage and immediately shut down. This is the safest solution by far and it just adds to their whole theme of charging safety. Big win in my book!
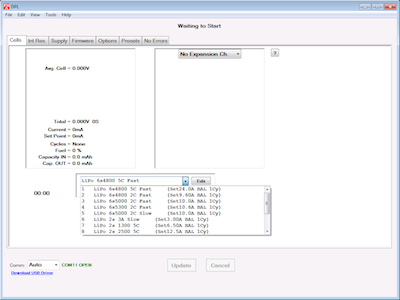
Ok, back to the PC software. The Cells tab will show you cell voltage and this is where you can command the charger to start and stop charging. One of the coolest things about this software is you have real-time control of the charger itself! That’s so cool! I find myself using this feature a lot both at the field and at home because I’ve always got my laptop out tweaking on FBL settings and it’s very convenient to leave the software running in the background and stop/start your charges as you wish.
Bouncing over to the IR tab, you can see the internal resistance of your cells and even further over to the Firmware tab, you can update the firmware in the charger when a new version is released. The Options tab has a bunch of small features that are really neat. You can increase or reduce the beep and sound volume as well as change how quickly the display on the charger scrolls through the screen. There’s also the quick start box in there that I have checked to allow you to start your chargers quicker by simply holding the start button down for two seconds.

Now we come to the Presets tab. This, in my opinion, is one of the most powerful features of the software. Under the Presets tab you’ll find an entire new list of sub-tabs that help define how and what your presets do. It would take me days to go through each little feature so I’m going to highlight some of the more important ones. First is how the charger looks at charge current. Now, you can just set a specific charge current and be done with it but there’s a neat feature here that is far more powerful. You can set your charge current for a single battery instead. So lets say we’ve got a flight pack out of our 700E that’s got two 5000’s and we want to create a 2C charge rate preset for it. We set our charge rate for 10A (one battery at 2C) then under the Detection tab we set it for 2P. We hook the batteries up on the MPA to charge in parallel, pick this preset, and hold down Start for two seconds. We’re now charging this entire flight pack at 2C for a total of a 20A charge.
Ok, so now you’re probably thinking well why not just create a simply 20A charge preset and be done with it right? Here’s why… lets say I’d like to throw two more 6s 5000’s on there that I use in my 550 heli and charge them all together on one port. Now rather than going through and creating an additional preset for four 5000’s, there’s a super cool shortcut… Pick the preset in the charger and simply hit the start button once. The first thing that pops up is “2P?” Remember, when we created the preset we had it defaulted to two packs in parallel. Hit the up arrow to increase that to where it says 4P and then hit start. Now we’ll be charging all four batteries at 2C for a total charge rate of 40A. This is so cool! What this ends up doing for me is that I’ve got about half the presets in this charger than I did in my other chargers. The charger is doing all the math for you and all you’ve got to do is tell it how many parallel packs you’ve got plugged in. Awesome!
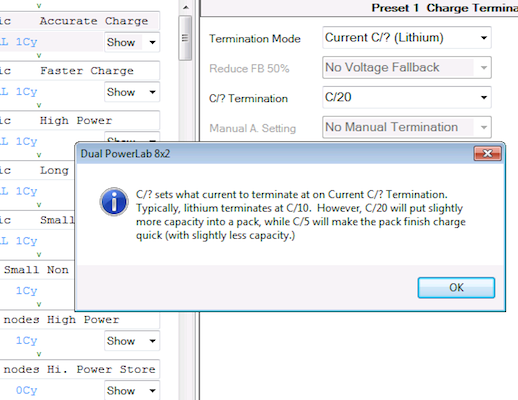
Second on my list of awesome features in the Presets tab are the little pop-up help menus. If you hover your mouse over the title of each parameter a little description will pop up that tells you what that parameter does and how it affects your charges. All of a sudden, I found myself in a position where the charger was actually teaching my how to get the most out of my charges. Way cool! I found myself taking my High Power Fast Charge preset and going in and tweaking all these little parameters to shave time off of my charges. I was now shaving minutes off charge times with the same overall charge rates as I was using on other chargers. Now, I’m not saying those other chargers didn’t have these options to modify charges like this, but what’s the point if I don’t know how to use them. The help pop-ups in the Dual Powerlab taught me how to get the most out of each charge.
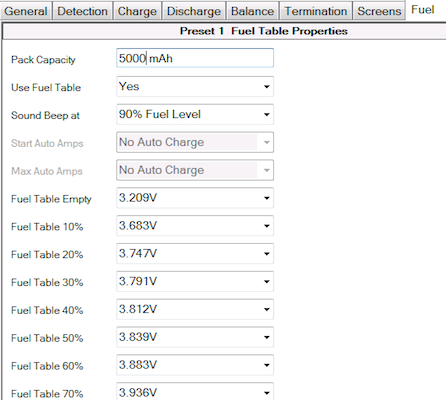
Another really neat feature is the Fuel tab. Here we can input the actual capacity of the battery and the charger will give us the option of sounding a short alarm when the battery reaches a pre-determined fuel capacity percentage during the charge. If you were to graph out (yes, we’ll be getting to that soon too!) the charge current over time, you’d find that the last couple minutes of each charge is focusing on balancing cells and isn’t really putting much back into the battery as far as capacity goes. If we set an alarm to sound at that point in the charge we can pull the pack off the charger and immediately go fly with little to no reduction in flight time. This is a godsend when you’re flying back-to-back out at the field.
For instance, I have my timer set and at the end of my flights I’ve got about 25% pack capacity left. If I pull my packs off the charger when the fuel alarm goes off I still fly to the same timer but I might have say 22-23% left in the pack. That’s not a big deal at all but when I’m flying back-to-back and only have an hour or so at the field that extra 2-3min I took off my charge times is a really big deal! That’s potentially two or three more flights in an hour. If you don’t stop the charge when the fuel alarm goes off, it simply continues and finishes the charge as normal.
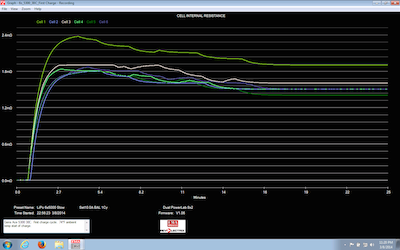
The final icing on the cake for the PC software is the ability to graph data in realtime. Yes, live graphing! Fuel percentage, charge current, pack voltage, internal resistance, cell voltage, and pretty much anything else you could want. It can graph all of those in real time right in from to your face. This is one of the coolest things I’ve seen. There some other companies that offer graphing but it’s always a “logging” function that has to be downloaded after the charge is done. I’ve gotten to the point now where after about 5-10 charges on a battery, I will graph out the internal resistance of the pack and save that graph in a specific folder. Then every 50 flights or so I’ll go back and graph that same battery again. What this does is allows me to visually see the health of my packs as I accumulate more flights.
Remember when we were talking about cutting down charge times by tweaking settings in the charger? Here’s the perfect place to actually see that happen. Graph out the charge current or fuel capacity over time and you can see at what time mark you’re putting very little back into the pack and then set your fuel alarm for that point. The options really are endless on what you can do with the graphing. You can even graph your power supply input voltage over time. Having a problem with your power supplies and you’re not sure what’s going on? Well, graph your power supply voltage or input current over time and see if you have a power supply that’s failing.
I could seriously go on forever about all the neat features this charger has… I can’t think of a better case where we shouldn’t judge a book by it’s cover. What this charger lacks in visual “bling,” it makes up for ten-fold in function and reliability. The fact that Revolectrix put’s safety at the forefront of their chargers is a big thing in my book and there’s a certain piece-of-mind I get with this charger that I haven’t found with others. This charger can not only scratch my nerd itch one minute but immediately transform into the most simple-to-use charger the next minute. There’s no question that the Revolectrix Dual Powerlab will stay in my charging fleet permanently and I’ll be happy with it for many years to come.
Thanks again to Jamie at FMA Direct for sending us the Revolectrix Dual Powerlab for review and I hope you guys have a better idea of what this charger is capable of… If you have any questions, feel free to email me at .
– Nick