SAB Heli Division Goblin Speed
Written by: Justin Pucci
As always, the first thing that I like to do in my reviews is to thank those people who made this opportunity possible. This time around, I want to send a huge thanks and shout out to Bert Kammerer, SAB Heli Division, Heli Direct, and Nation Citizen #12, my friend Cris Trebbi. This has been a long time in the making and started as a wild idea of mine late last year when the Goblin Speed was first announced. Being a closet speed freak and hearing from a number of listeners who were apparently in the same position I was, I thought it would be perfect to get this heli out on the airwaves in review form with a “first entry into the speed world” style approach.
As in any other hobby, the niche areas are even more intimidating, shrouded in mystery, and expensive to gain entry to than the core stuff, so what better way to do a review than to take SAB’s Goblin Speed and take it from kit to kick-ass as a speed novice might do it? So, that’s exactly what I did…
Product Description
To get started, lets clear something up for all of you speed-heli elitists out there that think that this heli is a joke. Take a look at what SAB puts on page 1 of their manual:
![]()
Even SAB is up front about this heli not being a Banshee or Diabolo killer, so ease off a bit and let us beginners have their fun too. 😉
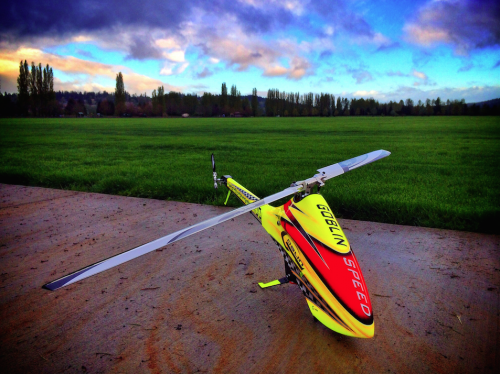
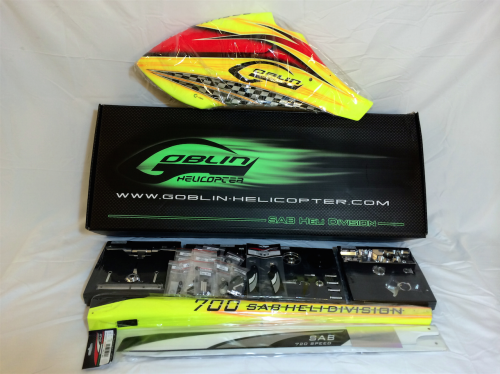
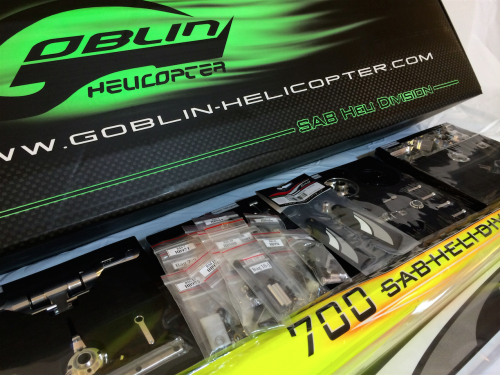
Ok, back to business… This helicopter comes in a pretty beefy box that originally took me by surprise. I swore this thing had two helis in it, but when I opened it up, it was apparent what was going on: the canopy is huge! It really is something that you have to see in person to appreciate. I’ll even admit to not being too hot on the looks of this model upon initially seeing the press release, but it really does grow on you.
After I got over the shock of the canopy size, I started unpacking things. Let me tell you, if you’ve not built a Goblin before, you’re in for a treat. Like the other SAB kits, this one comes very well organized with all of the big aluminum parts in four assembly-specific foam trays and the canopy, boom, and smaller bits and pieces come in their own separate boxes too. It also includes a set of SAB 720mm speed main blades and 95mm speed tail blades. The finish on these parts are among some of the best I’ve seen in my many heli builds with nicely polished aluminum parts, beautiful painting and decals on the canopy and boom, and even a nicely painted set of white and silver blades to match.
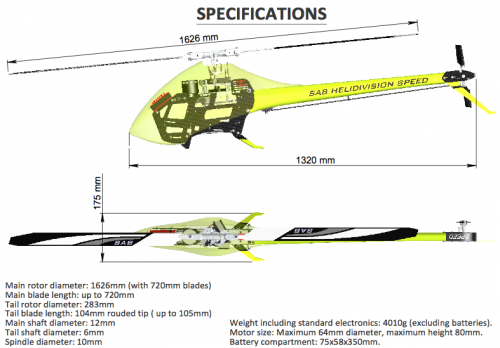
The Goblin Speed is about the same size as a standard 700-class heli and, not surprisingly, it’s built off of the well-known and proven SAB Goblin 700 Competition design. In fact, there’s not a lot of difference between the two except for the ESC mounting system, the front frame sides, landing skids, canopy, and tail case. Remember, SAB built this to be a hybrid model that gives hobbyists the opportunity to get their feet wet in the speed arena without committing a significant amount of money to a speed-specific airframe. At the end of the day, if speed isn’t your thing, you can still 3D the hell out of this heli just like any other Goblin. Of course, it goes without saying that a large majority of its parts are shared with the Goblin 700 Competition, so getting spares won’t be an issue.
The Build
Alright, so before we get started with the build, remember that no matter what comes assembled in your brand-new heli kit, disassemble it and make sure it’s degreased and correctly lubed before thread-locking it and reassembling things. I found that all the assemblies that came in my kit were done correctly and did not need to be re-done, but you never know unless you check.
Building the Goblin Speed, like any of the other Goblins, is a rather quick and painless process. I’m pretty damned meticulous and slow about my building as Dan, Nick, and Jessie can attest, but I even got through this one in a little over five hours of total build time. Now, I obviously spent a fair amount of time taking pictures for this review, so I could probably have done better, but you get the idea…
First off, let’s look through the manual. SAB really puts a lot of effort into their manuals and the Goblin Speed is no different. The manual is a 48-page, color printed, high-quality manual with a very clear and logical layout and good written descriptions throughout. There are not only computer-generated images of the various sub-assemblies in exploded view, but there are also photos of key features and build steps describing what to look out for or how to orient something.
In addition to the standard build instructions, the manual also has a few pages that describe power system and gearing options so that the hobbyist has a feel for how to set things up for speed flying with mild to wild configurations.
So, I worked my way through the manual and slowly but surely started to make this collection of parts look like a heli. First, the frames, then the transmission, the main rotor, the electronics installation, the tail, and finally the canopy…
Frame Assembly
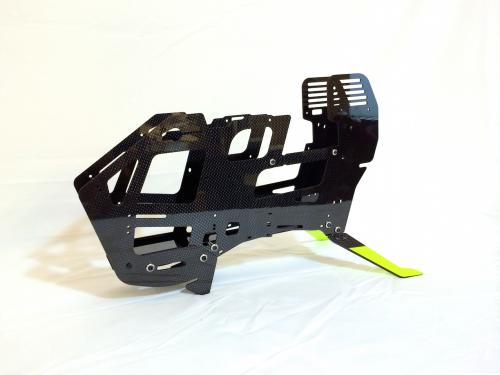
The frames go together the fastest of all the major sub-assemblies because you’re really only dealing with a dozen or so major pieces. There are two main frame sides and two front frame sides and both are made of 2mm carbon fiber and finished with a mirror polish. All fasteners are finished with a nice-looking aluminum washer that fits around the head of the cap screws and the tiny landing gear are made from some of the strongest 3mm carbon fiber that I’ve personally ever seen.
There’s not much to worry about with the frames. Choose which landing skid style you’ll want to use. The shorter ones are ideal for speed flying because of their small size and backward-swept profile, but if you’re uncertain about whether you’ll be comfortable with the stability of them, then start off with the larger forward-swept skids just in case.
Make sure to sand any of the edges that you anticipate running wires over or near because they’re quite sharp right out of the box. Also, think ahead of time about which side of the frame you’ll want to run your ESC throttle wire before installing the H0370 Wires Support. Now that we’re done with the frames, let’s move on to the transmission sub-assembly.
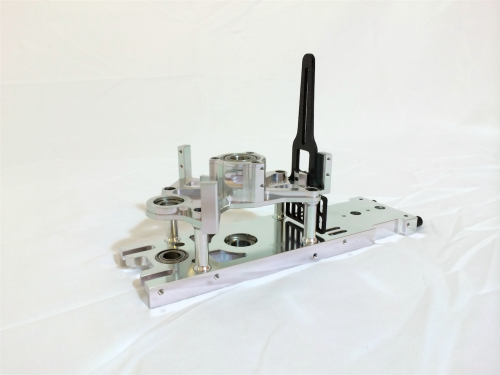
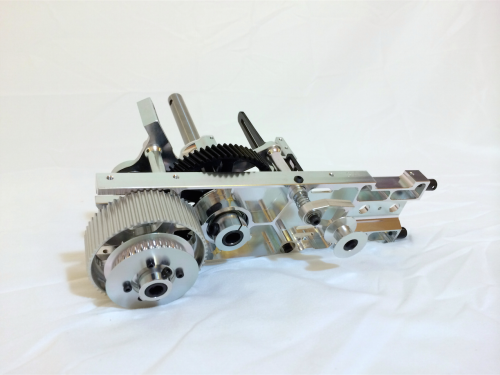
Transmission Assembly
The Goblin’s transmission is a work of art to to me as an engineer. It’s a two-stage system that uses aluminum pulleys and heavy-duty timing belts to drive the main and tail rotors. The motor makes use of a large 22-tooth pulley that connects to a 60-tooth autorotation pulley. This 60T pulley shares a shaft with both the 37T tail drive pulley and the 19T drive pinion and also houses the dual one-way bearing autorotation drive assembly. The 37T pulley drives a belt that turns the 27T tail pulley in the tail case and finally the 19T pinion drives the 66T steel main gear.
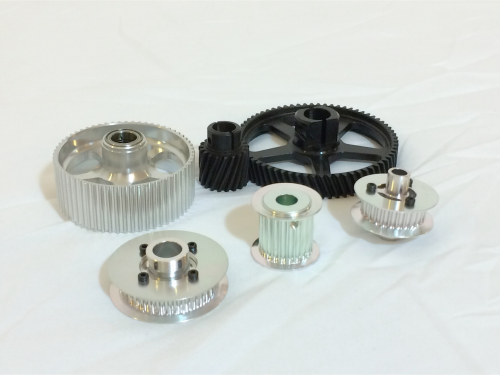
This seemingly complex assembly is the heart of the Goblin and allows for such a narrow canopy profile when compared to other single-stage helicopters that have larger-diameter main gears. The kit comes with a 22T motor pulley, but you can upgrade yours with pulleys up to 25T for some really high head speeds.
When you’re assembling the transmission, the main thing you need to pay attention to is the secondary shaft assembly that contains the autorotation, tail-drive, and drive pinion pulleys. The kit comes with shim washers to fit between the 60T auto pulley and the 37T tail drive pulley to in order to fine-tune the vertical play of the shaft. You’re going for approximately 0.5mm of vertical play and having assembled three Goblins so far, I can say that it usually takes between two and four shims to get this condition.
Once you’ve gotten the entire transmission built, make sure that you lubricate the main gear and the drive pinion with gear grease. I use TriFlow Synthetic grease and a toothbrush it works great. The final step is then to install the motor in the motor mount, which is pretty straightforward. In terms of getting the motor pulley height adjustment, I’ve found that using a 0.2mm head shim (HC232-S) between the base of the pulley and the motor shaft bearing support gets you in the ballpark, but you’ll need to do some fine adjustment once you get it in the frames and add the belt.
Main Rotor Assembly
The Goblin Speed comes with the SAB HPS head, which is a rather beefy version of your standard conventional flybarless head. This head is beautifully machined and goes together quite easily with no real quirks or tricky spots to speak of…as always though, make sure that your thrust bearings are well lubricated and that your spindle and bolts are NOT! 😉 This head will be subjected to far higher stresses than a typical 3D helicopter head and, as such, you need to make sure that you build and maintain it correctly.
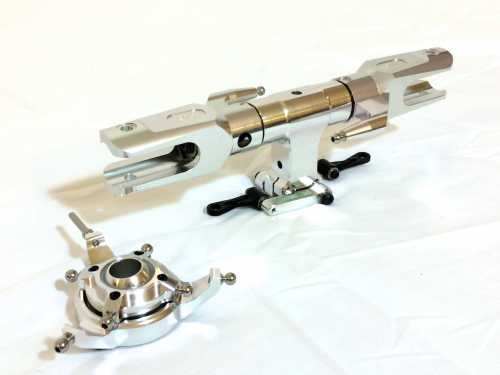
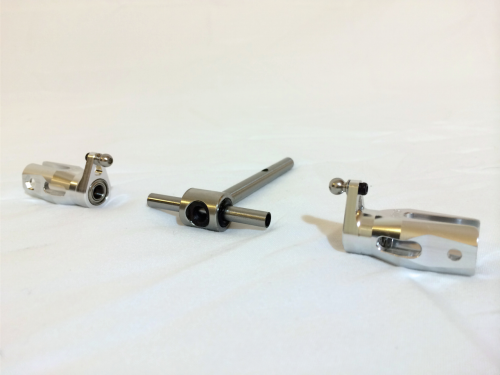
Tail Rotor and Boom Assembly
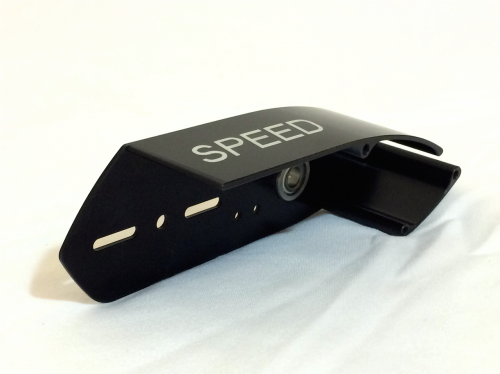
Not unlike the main rotor assembly, the tail assembly is an easy build and doesn’t have much to worry about in terms of gotcha’s. The tail rotor system on the Speed is shared with the Goblin Competition kits in that it uses as damped spindle configuration that mirrors the design of the head. The tail case itself is a work of art in that it’s a one-piece black-anodized aluminum housing with “SPEED” laser etched into the top. This mates with one of two carbon fiber side plates included in the kit – a simple, finless side plate for minimizing drag at speed and a more conventional, finned side plate. I chose to use the finned side plate both for looks and for tail blade protection during take-off and landing.
As I mentioned in the main rotor assembly section, this system is also under a significant amount of stress compared to standard 3D setups and needs to be built and maintained properly, so please please please make sure that lube and thread locker are both in their respective locations and that everything in the tail pitch system is smooth and does not bind at travel extremes.
The Goblin Speed tail boom assembly is the same as what is used in the 700 Competition model, so if you’ve built one before, then you shouldn’t be too surprised. However, if this is your first Goblin build, then take your time to read the directions, look at the pictures, and plan things out. Page 25 in the manual does a great job of explaining how to do each of the three major assembly steps with good tips on how to ensure that you do it correctly.
I have only three pieces of advice:
1) I use a 1.5mm hex driver during install of the locking elements at the rear of the boom to stick through the screw holes and line things up properly before squishing the double-sided tape down for the rest of eternity.
2) I use copious amounts of medium CA and kicker to establish a good and solid fillet of adhesive between the H0082-S Boom Spacer sides and the interior walls of the boom.
3) Wrap your tail servo wire once around the H0082-S Boom Spacer and hot-glue it down rather than using zip ties. This holds the wire quite well and can be easily removed when needed, but doesn’t run the risk of cutting into the insulation over time.
Electronics Selection and Installation
Now that you’ve gotten your main frame sub-assemblies complete, you simply need to bolt the transmission and head/swashplate assemblies into the carbon fiber main frames and then you’re on to electronics installation…
First and foremost, let’s talk servos. Not all of them fit this heli…what do I mean? Well, just what I said. The canopy on the Goblin Speed is very tight-fitting, as you might imagine. This leads to a situation whereby the rear-facing upper-right corner of the right cyclic servo case is a potential contact point with the interior of the canopy if the case-to-mounting flange distance is large enough.
I’ll make it easy on you – measure your candidate servo from the top of the mounting flange (the part that makes direct contact with the aluminum servo mount on the heli) to the bottom of the case and if the distance is less than 31mm, then it should fit with minimal to no issue. From 31-33mm it gets really tight and will likely rub the case corner, wear a hole in the canopy, or crack the canopy depending on how tight it is and the case material composition. For 33mm and above, it’s unlikely you’ll be able to make it work unless you do some serious customization (read: grinding) of the servo case. See the following list for some available servos that will likely provide you with a hassle-free fit:
- MKS HBL665, HBL850
- Futaba BLS451, BLS351, BLS156HV
- Savox SB2284SG, SB2273SG
- BK DS-7001HV
- Align BL800H, DS610
Ok, so now what makes a good speed servo? Well, you’re going to hear lots of different things ranging from “the fastest you can get” to “the torque-iest you can get” and anywhere in between. Here’s the deal – speed is of secondary concern to torque because if your servos can’t hold the blades in the desired position under the enormous loads induced by high-speed, then you can stall them and that very quickly becomes a bad day when traveling at over 100mph!
What’s the right torque level? Based on the collective forum-documented experience of various other much-more-seasoned speed freaks than me, the venerable Futaba BLS451 seems to work just fine for the competition and world record-breaking scene at a modest 150 in-ounces of stall torque. So, to that end and based on my desire to do this review from the perspective of a non-deep pocketed beginner, I chose to go with my equivalent and venerable MKS HBL665, which puts out about 210 in-ounces at high-voltage. As far as the tail goes, any standard tail servo that you would use on a 3D heli will work just fine, so choose your favorite and move on to the next step.
Here’s my last bit of advice on the servos: just go ahead and buy the SAB plastic servo horns so that you don’t have to worry about “customizing” your horns with a Dremel tool to get them to fit into the tight confines of the cyclic servo mounting structure.
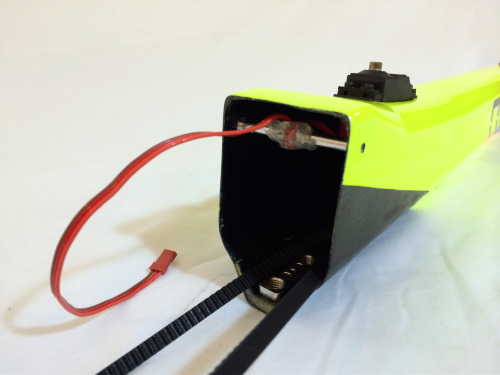
Now then, on to the wiring. if you’re like me, you’re pretty particular about how your wires are routed and the overall visual appearance of the wiring job. This helicopter gives you several options for making it as close to perfect as you can, but it doesn’t come without a bit of a challenge. This challenge comes in the form of the ESC mounting location. Since it’s up at the front of the heli, it makes getting the throttle signal wire a bit tricky to get back to the flybarless system in a neat and discrete fashion.
Depending on what brand of ESC you choose, you may need to use a servo extension to get it to reach. Luckily, SAB has given us a bit of help with a new little gadget called the Wires Support (H0370), which is a small carbon fiber strip that bolts across one of the rearward openings in the side frame to help run the wire more directly to the flybarless system. Getting the wire to the support ends up being more challenging to make look good, but I found that some properly-spaced zip ties and servo tape worked wonders.
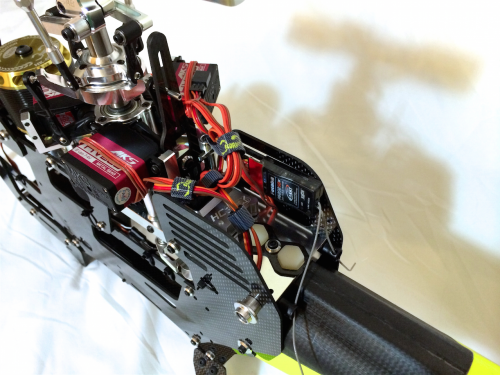
The other challenge will be routing your receiver pack or BEC wires up through the frames and to the flybarless system depending on where you place them. I decided to run an RX pack mounted directly under the main shaft on the bottom of the battery plate, so I ended up having to run my power wires up through the inside of the frames and through the wire pass-through cut into the sides of the metal transmission. This works fine, but adds a bunch of wire to the heli in order to get the length necessary to reach the pack.
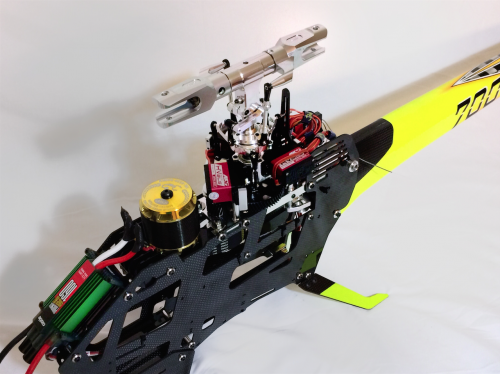
I chose to run the Bavarian Demon 3SX flybarless system because, in my extensive research, the Bavarian Demon seems to be the universally accepted standard for speed FBL systems with the BeastX coming in second place. If you’re running a flybarless system that has its bus terminals facing upward like I am with the BD3SX, you’ll need to forgo use of the Flybarless Support (H0043-S) and mount it directly to the aluminum transmission base. Then your receiver can mount to one of the two carbon fiber slotted sides and the antennas can be run through the two antenna guides at the rear of the transmission base. I actually like this setup a bit better because I feel like my flybarless controller and receiver are more protected.
Canopy Installation
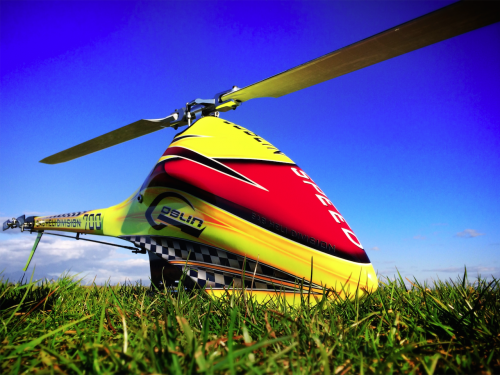
Aaaand here we are! The key to the Goblin Speed! The sexy-ass canopy! I’m not being funny either…yes, yes, when I first saw it, I wasn’t the biggest fan, but after spending some quality time with it, I’ve really come to appreciate the work of art that is this canopy. It’s a pretty damned optimal combination of aesthetics and functionality if you think about it.
Firstly, it’s low profile and smooth lines ensures that your Goblin Speed is going to have about the best aerodynamics that can be asked for without going with a full fuselage. Secondly, it’s made of strong, but lightweight fiberglass with a beautiful paint job courtesy of Canomod. And last but not least, the back portion that wraps around the boom and rear of the airframe has a neat locking system that prevents the canopy from coming off during high-speed flight.
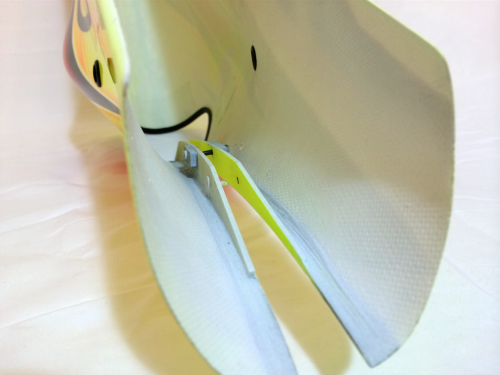
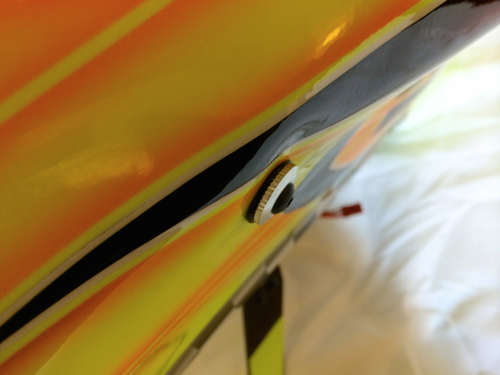
In fact, the rear locking mechanism is probably one of my favorite features on this kit. It’s quite ingenious and yet very simple and robust. It consists of two brass pins and an M3 socket head cap screw that protrude from a flange built into one side of the canopy and a matching flange on the other side that has three holes to accept the pins and screw. The pins slide into place to lock the position of the canopy halves and the M3 screws into a nylon locking nut embedded in the other flange. So, all you have to do is get the canopy on and positioned correctly, snap the pins in place, and then tighten the M3 screw through a conveniently placed hole on the left side of the canopy and now you’re ready to install the thumb screws.
Ok, so nothing like extremes right? I’m going to go from my most favorite to my least favorite part of this kit – the thumb screws. They are aluminum, large button head-style thumb screws with only a bit of knurling on the outer diameter and they thread through the canopy sides and grommets into the standard Goblin canopy positioners. Here’s the problem, the aluminum is very soft and galls extremely easily if you don’t keep it lubricated and thread it correctly. Because the canopy is a very tight fit, it can be a challenge to get the thumb screws started into their threads without cross-threading and let me tell you, it only takes one bad move and you’ve got yourself a stuck screw.
Now let’s take a step back, ok? In theory, these things are great…low profile heads to minimize drag at high speeds and nice wide heads for complete engagement of the canopy grommets to minimize the chance of backing out. This would work great if it wasn’t such a tight fit to get the canopy holes lined up and the knurled portions were large enough to allow for actual hand-threading…
Here’s the solution: Use a synthetic grease like TriFlow to keep everything lubricated, only thread the thumb screws in using a 3mm hex driver, and only thread them in once you’ve positioned the canopy such that the canopy positioner outer diameter has slipped inside of the rubber canopy grommet. If you adhere to these three simple rules, then you should be just fine.
Just in case you don’t follow my advice, have a set of spare thumb screws (H0378) and canopy positioners (H0008-S) for when you get one set stuck. If you do, the best way to remove them is to get yourself a couple of drill bits and drill out the thumb screw progressively. Start with a 3mm drill bit and get the core of the M3 screw that’s threaded into the thumb screw body then move on to something like a 6-8mm bit and drill out the softer aluminum thumb screw body. At this point, the whole assembly should just come right out and you won’t have damaged your canopy or frames.
Final Assembly and Setup
At this point, you should have all of your major sub-assemblies ready to combine to finish your Goblin Speed build. There’s nothing too complicated about snapping the bits and pieces together, so just follow the directions in the manual and you should have something that looks like a helicopter in no time! Once you’re there, you’ve got just a few smaller things to watch for…
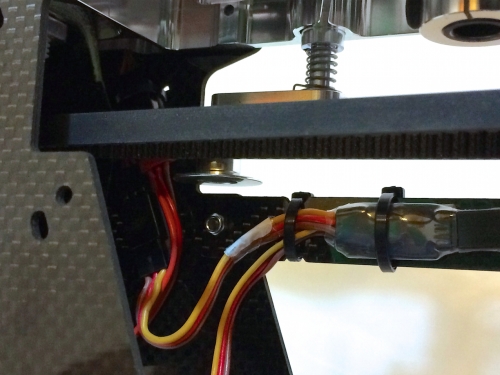
Once you get the tail boom assembly loosely attached to the main frame section, make sure that you tighten down your M8x20mm nylon screws and lock them with the safety lock (H0038-S). They should be hand tight using the included plastic wrench, but not too tight. Also, make sure that the two socket head cap screws that thread through the frame sides into the sides of the tail boom are well coated in thread locking fluid and well tightened.
Now, take your tail servo wire and attach it to a 6-inch servo extension wire that runs to your flybarless system. At the location of the connection to the extension, use a piece of double-sided tape to stick the connector assembly down to a side frame in between two of the vertically-oriented zip tie hole pairs and then zip tie it down. This is important because in the event of a crash, the tail will break away from the main frames via the nylon screws and pull your tail servo wire with it. With this setup, the connector will pull right out of the extension and no damage will be done to your servo wire.
Get your tail belt engaged onto the tail drive pulley in the correct orientation so that as your head spins clockwise, your tail rotor spins counter clockwise. Then tighten it by loosening the tail case and pulling on it until the belt tensioner sits roughly parallel to or slightly angled outward from the left side frame.
Finally, get your tail, cyclic, and head linkages built up and attached and make sure that you’ve leveled the swash, zeroed the blade grips, and adjusted your tail travels. Go through the rest of your flybarless system parameters and set them up as you would for a maiden of a typical 3D heli because you’re going to need to break in the machine with a few flights before you move on to full-on speed flying.
Power System Considerations
As we all know, the power system is the heart of any speed helicopter and it needs to be chosen and set up correctly in order to maximize performance and minimize risk to the rest of the machine. This is where you’re likely to spend the most money and time if you end up getting bit by the speed bug because of the relatively limited number of choices available for each of the major components. What do I mean by components? The six items in the power system that are most critical to the success of the heli at high speed are the ESC, motor, batteries, wires, connectors, and the pinion.
This is really where I decided to choose components that are common and reasonably priced for the average 3D heli pilot, but just so we understand things, let’s go one part at a time, shall we?
The Electronic Speed Controller
The primary considerations for choosing your ESC are the maximum current that you expect to draw and the voltage at which you want to run your system (12S-50.4V or 14S-58.8V). A 3D heli may see peaks of current in the 120-160A range for a second or two when it’s being smacked around really hard, but a speed machine is going to draw high currents for seconds at a time (5-15 seconds) depending on how you perform your speed runs. Most of the ESC’s out there have a nameplate rating for maximum continuous current assuming some low airflow for cooling, but have the ability to sustain a 50-75% burst of current above their rating for a few seconds, so make sure you know what the true limits of your ESC are before you go speeding around with it.
As far as voltage goes, remember that a higher-voltage system will draw a lower current for the same power level. This, in turn, will stress your power system less, which generally equates to better overall efficiency and performance. With all that considered, 14S is the way to go, but not everyone can or wants to afford to run a 14S system especially if this will be their only heli running one. So, to that end, I chose to run a 12S system. This makes it cheaper and easier to find components that will suit my needs, as they’re all the same stuff that a typical 3D’er would use. Here are the available ESC’s in both voltages though so you know what’s out there:
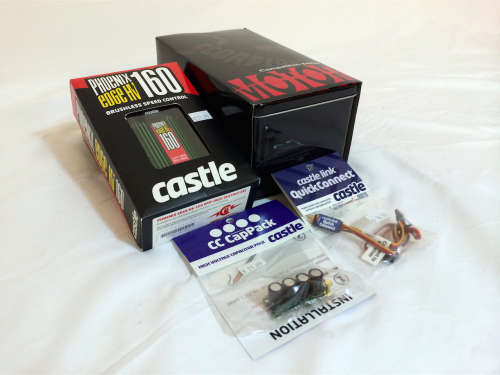
- Castle Creations Edge 160HV (12S)
- Scorpion Commander 160HV (14S)
- Kontronik Kosmik 160HV or 200HV (14S)
- YGE 160HV or 320HV (14S)
- Jeti Master Spin Pro 200 or 300 (14S)
So, I decided on a Castle Creations Edge 160HV as my “entry level” speed ESC. The Castle has a peak current cutoff that can be set as high as 280A (75% above the nameplate continuous rating) and a thermal cutoff of 100 degrees Celsius, which gave me significant margin to what I figured I’d be pushing through this machine.
With regard to use of a governor, yes…you’re going to use one, but no you don’t need it to be tuned to be able to hold head speed under varying loads such as what you see in 3D. During a speed flight, you’re going to be at full pitch for the 5+ seconds needed to get through a run, so your governor doesn’t need to be quick to respond or super aggressive. This is why I don’t mind using the Castle governor…
The Motor
Next on the list is the motor. Pretty much any of the high-power motors out there will do the job for you on the Goblin Speed. You generally want to lean towards a higher kv motor within a given voltage class so that you can get as much head speed out of it as possible. Targeting a 45mm diameter stator that is 30-45mm long is an ideal range of motor sizes for this application. Choose something that has a peak power in the 8-10kW range and weighs somewhere between 550-650 grams, as you don’t want to add unnecessary weigh to the heli. I would personally stay away from the 50mm diameter stator designs because they’re much heavier with no more (and sometimes less) available power.
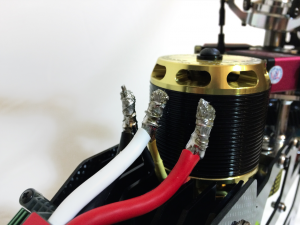
I chose the Scorpion HK4530-540 Limited Edition motor. This powerhouse weighs in at only 565 grams and has a peak power of 11kW. A quick note on the motor wire, single-strand large diameter (>1mm) wires are ideal for speed because of the lower internal resistance of the motor. This means that at high current, the motor will dissipate less energy through resistive heating and be more efficient. For the record, the Scorpion motor that I chose is wound with a single strand of 1.5mm wire in a 9-turn Wye configuration, which makes it incredibly efficient at high currents…just the ticket!
The Batteries
Ahh, batteries…my least favorite part of the heli industry. The dirty tactics that most battery manufacturers employ with regard to artificially inflating their advertised C-ratings makes choosing a pack for speed flying a challenge. Recall from battery theory that the higher the current draw on the pack, the lower the voltage sags. Packs with higher true C-ratings will sag less under the same loads than lesser-quality packs, which means we want a battery that has the highest realistic C-rating available. This is also the punchline for why 14S is better than 12S for high-load flying. Unfortunately, we’re only going to find true ratings in the 30-35C range regardless of the cell count, so we’re just going to have to make do.
So, since I decided to run 12S, I figured I’d give some of the typical battery brands a try and see what they gave me. I chose the following packs and flew them in a repeating cycle throughout my testing of the machine to see how they all held up:
- Pulse 6S 5000mAh 45C (measured C-rating of 32C)
- Spyder 6S 5300mAh 30C (measured C-rating of 30C)
- Gens Ace 6S 4400mAh 35C (measured C-rating of 26C)
- OptiPower 6S 5000mAh 50C (measured C-rating of 35C)
The Wires and Connectors
A lot of people don’t think of the wires as being that big of a deal, but they’re very important for speed flying. Again, it all comes down to how much current you’re trying to push through the system and how much resistance your wires contribute to the circuit. The higher resistance (smaller the wire), the more heat gets dissipated in the wires, which raises their temperature, which increases their resistance further, which, in turn, dissipates more heat. Get the picture? Eventually, this vicious cycle causes the wire to get so hot that the solder will melt and it’s game over. This means that you need to run large-diameter wires in as short lengths as possible. I employed 8AWG wires in lengths not exceeding 4 inches between the ESC and input connectors and between the motor and ESC.
Likewise, the connectors need to be chosen such that they’re capable of the currents that you’re expecting and they have a solid, positive engagement. Loose or insufficiently-rated connectors will have a relatively high resistance that will also heat up in the same way as the wire when high current is flowed through them. I chose to use a single-bullet system that has RCPROPLUS Supra-X 6mm connectors on the main power lines and PRC6 6mm connectors on the series line between the two batteries. Both of these connector types have a continuous current capability of 200A and fit together very tight. For the motor, I decided to directly solder the ESC wires to the motor wires to eliminate any potential issues with connector resistance, solder joints, or engagement.


Finally, you need to have good solder joints…this is something that people ALWAYS overlook as being important. You can not afford to have cold or contaminated solder joints on a speed machine or the resistance of the bad joint will definitely cause a failure. To be completely certain you’re going to be good, you should practice before you make the real solder joints. Make sure you have a good quality, high-power soldering iron and that your joints are shiny and clean-looking when finished.
The Pinion
Ok, once you’ve got all of the above-mentioned stuff chosen and set up correctly, you’ve got to decide on a pinion. The stock kit ships with a 22T pinion, which will get you a pretty good spread of head speed depending on what ESC you choose. I suggest that you use a head speed calculator to get a feel for what range of head speeds you’ll be capable of running once you know which ESC and governor you’ll be using.
For my setup, the Castle has pretty limited head speed range capabilities for a given pinion, so I needed to have a number of different pinions to get the head speed range that I wanted to test out. Either way, the goal is to target a throttle percentage of around 90% for your desired head speed so that under load, the ESC is operating at 100% duty cycle. Why? Because resistive heating through the MOSFETs (power switches) inside the ESC is minimized at high duty cycles or in other words, when the switches are closed most of the time per switching cycle. If you’re looking to follow suite and try out the Castle, then this is what you’re going to need for the following head speeds to sit around 90-100% throttle under load:
- 2200RPM – 22T
- 2300RPM – 23T
- 2400RPM – 24T
- 2500RPM – 25T
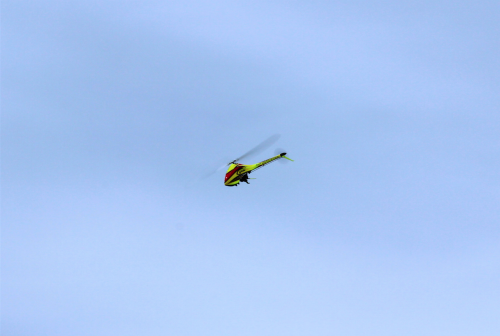
Flight Performance
Aaaaand now the moment we’ve all been waiting for! How does it fly?! AMAZING! But, before we get to the details…
Break-In
I want to quickly state that you need to make sure you break in the heli for a few flights before you go crazy. SAB recommends a few flights at around 1800RPM mainly to get the metal-on-metal main gear system to bed in a bit. I spent about three five-minute flights doing some smooth and light 3D, circuits, and simple big air maneuvers just to put the system through some varying loads and flight conditions. Be sure that for these first flight you keep the main gear and drive pinion well lubricated. The lube tends to get spun off the gear while flying, so I re-lubed it before each of the first few flights. Once you’re done with this break-in period, you can fall back to lubing it the earlier of once every 20 flights or when it starts to look dry.
General Flight Considerations
Now that the heli has been broken in a bit, we can move on to actually speed-flying it. For this, I set my radio up with two main speeds. My normal and IU1 speeds were always at 1800RPM. This gives me the ability to take off and land in a safe and low-speed condition. Then, my IU2 was set to the speed that I planned to fly my speed runs for that flight. For testing purposes, I ran 2200-2500RPM in 100RPM increments and tested each head speed over the range of collective pitches from 12-15 degrees.
Take off in normal or IU1 at your low head speed setting and observe the heli for a few seconds. Check for shakes, wobbles, sounds, wags, or anything else that doesn’t quite seem normal. Remember, when you bump this thing up to 2500RPM, there’s a WHOLE lot more stress on the machine than at 1800RPM, so something weird-looking in IU1 may turn into something catastrophic in IU2.
Once I was convinced at the beginning of each flight that everything looks, sounds, and is behaving well, then I would move the heli out about 30-50 feet from me and up to an altitude of around 30 feet and then begin into my first speed run. On my way towards my stall turn location, I would then flip the flight mode up to IU2 so that the heli was at a safe distance from me and others when it first goes into high head speeds. Please don’t start your heli at 2500RPM at take-off, it’s unsafe, scary, and isn’t going to do your batteries any favors once you get to the actual speed portion of the flight.
Speed Flying 101
Alright, so now we’re barreling towards our stall turn location in order to do our first ever speed run. Hopefully you’ve been practicing your right-to-left and left-to-right stall turns on another, slower heli so that you’re equally comfortable on both sides. Choose your direction, send the heli out about 300-400 feet in that direction and then begin to pull up into a stall turn. This part of the run shouldn’t be any different than your typical, everyday stall turn.
Once you’re at the top, get the nose pointed down, make sure you’re at zero collective, and check for any unwanted roll attitude. In other words, at the top of your stall, you want the disk facing directly across the field in the direction you’re going to be traveling and your nose pointed straight down. Now, let the heli drop into the “course” and begin adding back elevator and positive collective until you level out at around 30-60 feet in altitude (higher if you need to still get comfortable with things).
Don’t worry right now about using up all your collective…instead, focus on a smooth addition of both elevator and collective and a clean (not jerky) transition from vertical to horizontal flight. Eventually, you’ll get better and as your heli turns the “knee” from vertical to horizontal, you’ll get your timing down to the point where you will have full collective applied just as you hit level with the field and you’ll be able to hold a straight line with little to no elevator input and the nose tipped forward at a 15-30 degree angle.
Alright, so you finished your first run, right? Nope…it’s not over yet and the Goblin Speed is still moving really fast, so pay attention! You’ve got to get yourself back up into your next stall turn before it’s too far away. Again, let the heli travel about 300-400 feet past you in the opposite direction and then begin to remove collective while simultaneously adding back elevator. This is a really important part of your run because if you pull up with too much elevator or too much collective, you can cause your power system to over-current. This is because you’re at the end of a 5-10 second sustained run at 150-200A, which puts your battery in a vulnerable position due to voltage sag and then you accidentally pull up with too much pitch and guess what? HUGE CURRENT SPIKE!
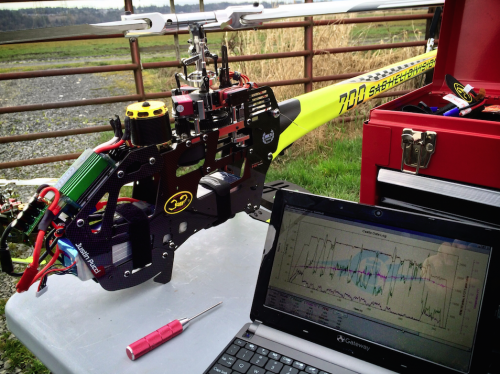
If you have data logging, check your log to see where your maximum current occurs in a given run…if it’s at the end, then keep practicing this part of the maneuver. Ok, so did you get all that?! Of course, that all happened in a bit under ten seconds, which definitely requires getting used to… It’s ok though. Take your time and you’ll become much more comfortable as time goes on.
Real-World Performance
So, what does over 700 of these runs mean in terms of data on speed and current? Well, let’s take a look…
Here are the stats behind the data we’ll be viewing:
- 95 speed flights encompassing 704 speed runs with an average flight time of 2 minutes.
- Each run consisting of approximately 400m total distance for a total of over 170 miles traveled by the Goblin Speed.
- Approximately 7,000 mA-h burned per flight and over 665,000 mA-h of total battery burned since the maiden.
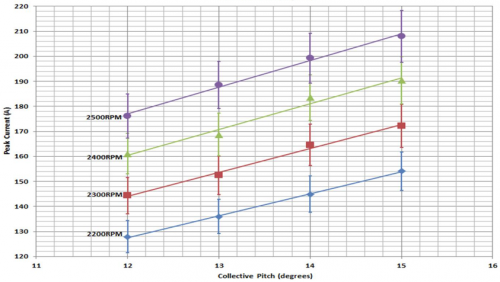
I want to make sure everyone can interpret the data correctly, so before I show it, let’s get a few things cleared up. The data in the plots below show a point per pitch and head speed combination. These points represent an average of all the runs performed at that condition and have error bars (the capital “i” shaped vertical lines) on them to represent the range of realized values about that average for both peak current and peak speed.
On to the measurements…The current was recorded at 10Hz on the Castle Edge 160HV and the speed was recorded on an EagleTree eLogger V4 telemetry system using the 10Hz GPS expander module. I am presenting peak values here because they are much easier to rapidly capture when you’re dealing with over 700 data points on each of the two parameters (>1400 total). That said, the peak currents are typically representative of the total average run current since there isn’t a lot of variation in current on a good run. The peak speeds; however, are not…
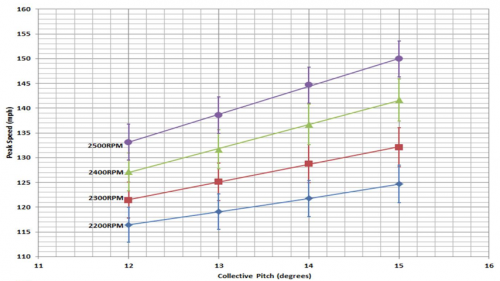
I have found that I can consistently calculate the true average speed over a run by multiplying the peak speed recorded by 0.95-0.97 depending on how clean the run was (0.95 is mediocre, 0.96 is good, 0.97 is great). This works for my flying style and may not work for others, but again with this large of a data set, I feel comfortable giving your that parameter for use in interpreting the plots. So, for example look at my average peak speed at 15 degrees and 2500RPM and lets assume a “good” run at 0.96. That means that my average speed over a 200-meter course was around 144mph and, in fact, I’ve computed that average on a number of runs, so I’m confident in the factor applied!
As I was eluding to above though, we don’t really care about peak speeds when we’re talking competitive speed flying because the heli’s speed is calculated by recording the time that it takes to move between two towers that are exactly 200 meters apart. Thus, we should try to keep a straight line in our runs to at least 200m in length and when we calculate our average speed over that run, we should find our peak in speed and average the data from that point to around 3.5-4 seconds afterwards. This, of course, is iterative…if the average speed that you just calculated translates into a distance covered over that time of less than 200m, then try again. See why I didn’t do this for all 704 runs? 😉
One more thought on interpreting the data – consider the error bars as defining the approximate range of run quality or pilot skill level for any given data point. In other words, a speed that lies at the bottom of the 12-degree/2400RPM error bar represents a relatively bad run and may be lower than a speed at the top of the 13-degree/2300RPM error bar. As you increase in pitch though, the skill level seems to be balanced more by the raw power available (i.e. even a really crappy run at 15 degrees and 2500RPM can’t be as bad as some of the better runs at the same pitch and 2400RPM.
Final Thoughts and Conclusion
So, what have we learned with all this stuff? Well, I’ve learned a lot! First off, this helicopter is very well designed and easy-to-build machine with the ability to take a major beating when it comes to stress and loads. The kit builds very quickly even for those of us who are slower than usual. Also, SAB gives you some options when it comes to how to set up the Goblin Speed so that you can customize your heli for what’s most comfortable or for what gives the most performance.
Perhaps the most important conclusion of all is that the Goblin Speed is a very capable offering to the speed arena. This helicopter combines a high amount of standardization with the rest of the Goblin line with the correct choice of custom parts to make it a great first speed heli, competitive speed flying trainer, or a hybrid speed’er/3D’er that’ll take anything that you can throw at it and look good while doing it.
Over my 3-plus months of testing, I’ve been able to put up speed numbers of up to 155mph at power levels up to 9,500W with a very basic, entry-level setup, so you don’t need the best of the best on components to go fast. Here’s the total price breakdown as reviewed:
- Goblin Speed Kit – $1279
- Castle Creations Edge 160HV – $275
- Scorpion HK4530-540LE – $350
- Bavarian Demon 3SX – $500
- MKS HBL665’s/669 Servos – $540
- Your favorite 12S 5000mAh packs – $300
- Your favorite RX packs or BEC – $100
- Your favorite high-current connectors – $50
- TOTAL – $3400
Not bad considering the versatility of the helicopter and remember that it can get a LOT more expensive than this if you want it to. 😉
As with any product, there are pros and cons, but in the grand scheme of things I think that the Goblin Speed makes out quite well given that my only con is the canopy thumb screw system. Some might think that the cost of the kit is another con at $1279, but when we’re talking price, I think that all comes down to the individual.
Is it more expensive than other 700-class 3D helis? Yes. Could you go out and buy another heli and try to go fast for less? Yes. BUT, BUT, BUT…you’re getting a heli with a majority of its components shared with its brothers, which equates to good parts support and pricing. You’re getting a heli that’s well known amongst hobbyists and well supported on the various forums by both other Goblin pilots and the factory and team themselves. And you’re getting a heli that’s 3D’able just as hard as it’s speed’able without the concern for HUGE crash costs or long parts shipping times. Sounds like a no-brainer to me…
Bottomline: Would I recommend that someone buy the Goblin Speed if they’re interested in speed flying and this is their only 700-class heli purchase for the year? Hell yes! And just think, if you don’t like speed flying after all, you can still smack the Goblin Speed around and look good while you’re doing it.
Thanks again to Bert Kammerer, SAB Heli Division, Helidirect, and Cris Trebbi for making this review possible and as always, if you have any questions or comments, please feel free to post on our forums, in the review comments section, or send me an email. Happy speeding!
– Justin