Written by: Jessie Salmonson
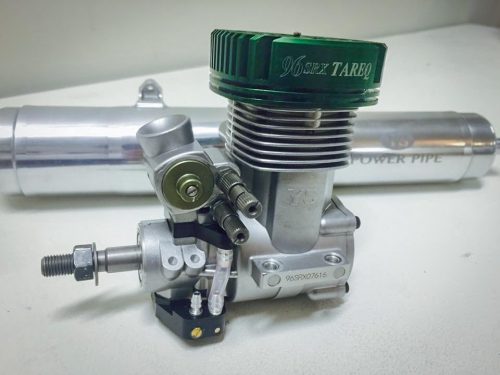
First off I have to give a huge thank you to Richard over at YS for the opportunity to do this review on the YS 96 SRX Tareq Edition motor. I know that we have many listeners that own and fly nitros on a regular basis that are very interested in this motor. We all know that when we want heavy helicopters and more power than we can handle, we head toward electric. When you want that light snappy model that forces good collective management a nitro is the key. Now the question is are these new lines of high powered nitro motors going to change that and close the gap?
Right out of the box this motor screams quality, everything from the green anodized head to the smooth rotating assembly. Right away I could tell that this motor was a extremely similar in size to the YS 91SR 3DS that I am very familiar with. When looking through the box it contained all of the usual contents. This includes the very important check valve that you want to make sure not to lose.
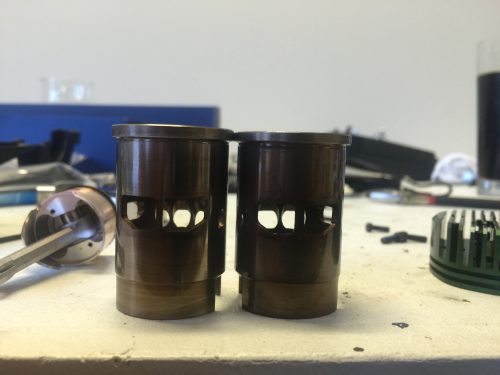
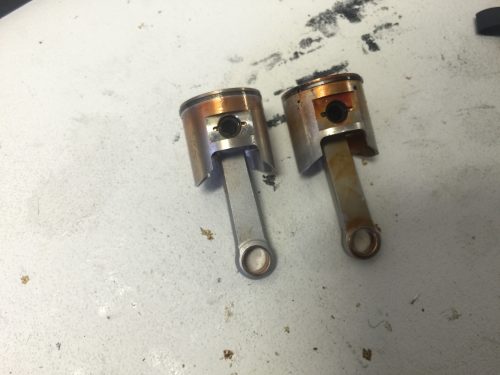
When taking the motor apart and looking at the internals we continue to see the high level of quality, which we would expect from YS. I found it interesting that the crank on this motor appeared to be dynamically balanced since in multiple places it was drilled and plugged (see picture below). This was a good sign because at the RPMs these motors operate balance is the key to a smooth running motor that doesn’t send vibrations through the rest of the model. The assembly of the motor is very similar to other YS models with the typical piston that is held on the connecting rod by the wrist pin with 2 retaining springs. The connecting rod then slides onto the crankshaft and the whole assembly gets sealed by a steel lined back plate. Some of you may have noticed that there are a few different versions of this motor available. From what I have heard the overseas version does not have the green anodized head or the steel lined backplate. The steel lining is important because it will be more wear resistant as the connecting rod lightly rides against it.
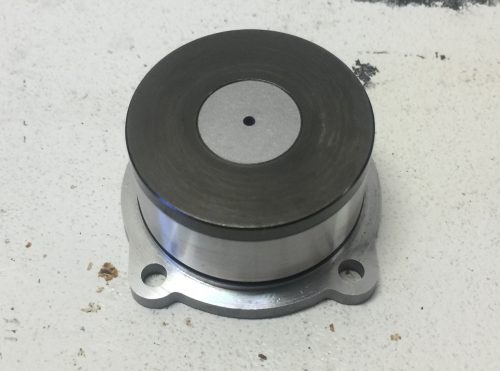
Steel lined back plate
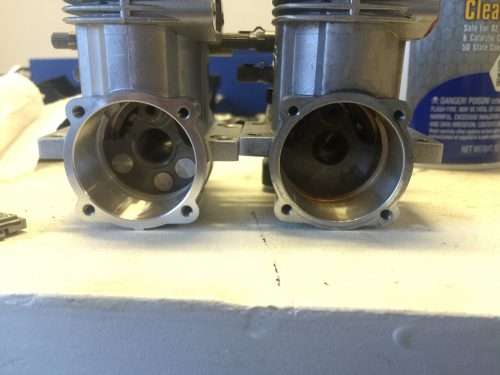
The YS96SRX on the left is drilled and plugged to create a balanced rotating assembly
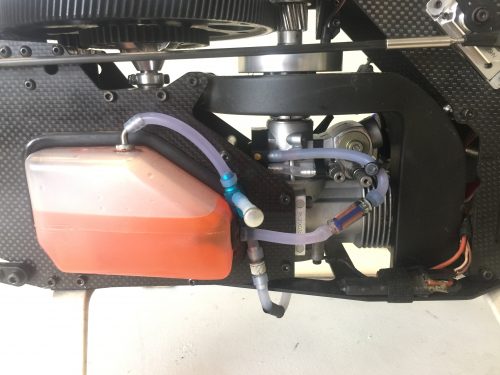
My setup
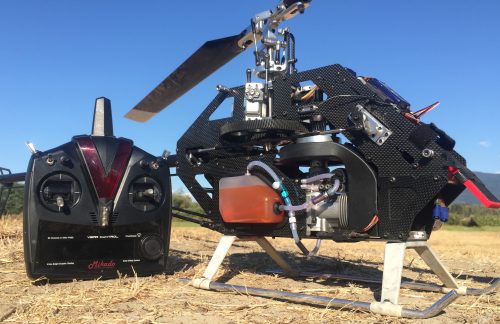
As I am sure you have heard me mention this YS 96SRX Tareq Motor and the YS power pipe are going to be installed in my trusty Synergy N7. For the first setup I am going to be leaving everything exactly as it was previously, including the 700mm Compass blades and the stock clutch. I know that some people will say the clutch is undersized on this heli but it has never given me any trouble so I decided to leave it all stock. In addition I will be using the Vbar nitro governor utilizing an Align magnetic RPM sensor. I am very comfortable with this governor and know how it should perform making it easy to tune and get flying right away. Lastly I will be using Coolpower 30% nitro with an Enya #3 plug.
Installation
Now it’s time to start the installation and get this motor installed in my Synergy N7. Overall the installation went very smooth which was to be expected. For those of you that are familiar with nitro you will feel right at home when putting this motor in your heli. The form factor seems to be nearly identical to the YS 91SR which I pulled out of the heli. What this meant is I didn’t need to do anything special during the installation. I could use my exact same motor shims and the clearances were fine on the fan shroud so no trimming was necessary. This was a huge bonus because I was slightly worried about the shroud clearance with the new head but everything went smoothly.
To finish off the installation and setup I used my existing servo arms on both the throttle servo and the carburetor. All of the geometry and throws appears to be identical so no changes were needed. Just to be thorough I did go back through the throttle endpoints just to confirm that nothing changed, which it didn’t. The last thing I did was set the headspeed at 1950 rpm which is my usual nitro head speed. I have found that this provides good collective response and puts the motor at a good operating RPM. Within a couple hours the motor was in the helicopter and I was ready to fly!
First flights and needle settings
When it comes to the first flight I was put in a slightly different situation than most of the people reading this. This motor was sent to me directly from Richard and he told me that the motor was already broke in, which meant I could bolt it in and hammer down. But for those of you that are buying a brand new motor I was told to start around 2.25 turns out on the mid (larger needle) and 2 turns out on the high needle (smaller needle). Keep in mind that this is going to be a very rich setting as it is supposed to be, but depending on your elevation you may need to come in a couple clicks on each needle so that you have a smooth running motor that will at least hover. Once you get a flight or two on the motor at these settings I would slowly walk the needles in to build a little bit of temperature and get the ring to seat properly. As far as break in goes as long as you follow your normal procedure you will be fine. This motor is like any other nitro engine and does not need any special treatment during break in.
For me my first couple flights were at the Othello Fun Fly. If you remember back to that episode you may remember me bringing this up. My first flight I would say wasn’t the huge success I was hoping for as I was fighting a surging problem. I later found out this was due to my extremely rich needle settings of 2 turns on the mid and about 2 turns on the high. As soon as I took the helicopter off the ground and the governor engaged it would surge like crazy to the point where the tail was blowing out and it was barely hoverable. Now since this wasn’t my first go around with nitros I knew right away what was wrong so I went in about 3 clicks on each needle. As a result the motor ran much better at these settings, which was immediately clear to the people watching because I continued on to put the helicopter through my normal routine without a problem.
My recommendation for the first couple of flights after break in is to start rich but keep in mind that you need to lean the needles out enough to get a smooth running motor that will produce power.
Tuning
We have all heard numerous times how easily the YS 91SR is to tune and how well it holds a tune. Coming into the review knowing this I was expecting the same thing for the YS 96SRX and I wasn’t disappointed. I immediately found this motor would be a set and forget type of motor, unless of course there were major elevation changes or huge temperature swings then small changes would be required as with any nitro engine.
As I review my needle settings please keep in mind that we have extremely mild temperatures in this area and we are at sea level so the air is nice and thick. These needle settings should be used as a reference and a gut check. First I want to do a quick rundown on my tuning procedure and what I have found works for me. I always start with the high needle as this going to dictate the total flow of fuel. To tune the high needle I perform very large and fast power loops while watching the smoke trail and listening to the motor. The audible pitch of a smooth running and well tuned engine is an acquired sound but trust me if you fly enough you will eventually be able to hear it! Basically I am watching for a good consistent smoke trail and a smooth sounding engine that pulls hard. If the engine begins to sound raspy or if I sense a loss in power I immediately land and richen up the high needle. Once the high is set I move on the the mid. To tune the mid I perform aileron tic tocs being extremely careful to keep my collective management in check. Once again I am listening to the motor and watching for smoke. For me I have a rough idea how much power the motor should be making so it’s immediately clear if it is too rich because the tic tocs will be falling out of the sky. I continue to lean out the mid needle until I feel the power is adequate (unless it starts to sound raspy then I obviously stop). Then as a final check on the mid I will hit throttle hold right in the middle of a tic toc and listen to the motor. If the mid is properly tuned the motor will return to an idle very quickly (one to two seconds), if it is too lean then it will hang on the pipe or take some time to return to an idle.
With that out of the way I found that for the high needle I ended up a couple clicks in from 1.5 turns out. For the most part once I had this dialed in I did not have to touch it again. For the mid I ended up right at 1.75 turns out. I found this to be a good balance between power and longevity of the motor as I didn’t want to wear through rings too quickly. One thing I will point out is don’t feel like you have to tune this motor to get every last drop of power out of it. Once you feel the motor is making enough power for your flying style just stop, the richer you can run the motor (to a point) the internals will receive more lubrication leading to longer lasting parts!
Power and Flight Performance!
Now for the part that everyone has been waiting for…so just how powerful is this motor?? To start I have to say I was pleasantly surprised with the overall power of this motor and the increase I say over my old YS 91SR 3DS. It really would take anything I could throw at it. Hurricanes, piro tic tocs, power loops and even the nastiest of pitch pumps 🙂 it took it all. I know people are going to ask so how does this compare to electric power? My response to you would be that although this motor comes closer to bridging that gap they will never be the same as the power delivery is totally different. With that being said this motor produces plenty of power and not at any point did the need for more power cross my mind. This motor is definitely a step up from anything I have flown in the past. The cool part is that this increase in power only comes at the cost of 30 grams of weight increase! This means that we are gaining on making the power to weight ratio of nitro that much better!
For most pilots you are probably trying to decide between this and a YS 91 SRX or a regular YS 91SR for that matter. I can say that you will see a benefit if you choose to go with this higher displacement motor. In general I would have no problem saying that this motor produces more torque and power. This motor is able to grunt and pull through some of the toughest moves and quick load change situations while maintaining its overall top end power. It was the small subtle things that really put this motor on top of the YS 91SR 3DS. As for me there wasn’t anything I could throw at this motor that it wouldn’t handle. For how easy it was to tune I was very impressed with the overall power this motor produced and would have no problem recommending it to anyone.
Now that we know it makes more power let’s cover the general performance. Overall I saw no increase in fuel consumption and my flight times remained nearly the same. In addition the motor was very easy to tune and worked very well with the Vbar governor. Within a couple flights I had the governor tuned and didn’t have to worry about it again. Lastly i didn’t notice any increase in vibrations in normal flights or from checking the Vbar logs. Overall it was a solid engine that help up to a summer worth of flying with no maintenance, just keep adding fuel and keep on flying!
YS 91 VS YS 96
Now that we know the YS 96SRX makes more power than the YS91 I want to compare the physical differences. To start with these motors use the same size block since the YS 96 SRX gets its extra volume from an increase to the stroke of the 91SR 3DS from 26mm to 27.5mm, while the bore or piston size remains the same. To accommodate the increased stroke the sleeve has changed slightly as the top flange is slightly thicker so the head sits just a touch higher (see picture below). Speaking of the head this is different as well which can be seen or noted by the green anodizing. The last part that I know is different is the crank. As I mentioned earlier the YS 96 SRX crank is different as the stroke has increased and it appears to be dynamically balanced.
If you connect the dots you probably realized that it’s possible to convert your YS 91 to a YS 96 with a few simple parts. I have heard reports from a couple people that they sent their motors in to YS for a repair and during the process also requested an upgrade to a YS 96 which was possible with these few simple parts!
Final Thoughts
In the end I have one heck of a motor in my Synergy E7 that I am very pleased to report will be staying. If you are currently in the market for a nitro motor for that new build then choosing the YS 96 SRX Tareq Edition seems like a no brainer to me. When you take in to account the price comes in at 429.99 which is only $35 more than the YS 91SRX the decision is pretty straight forward. Now the really tough choice is for those of you who are looking to upgrade from a 90 sized nitro engine. If you are pushing the limits your current motor then this is going to offer you a nice bump in power. For the rest of you that currently own a YS 91 you may want to look in to the upgrade option. In the end I really feel this motor takes a step in the right direction for nitro helicopters, anytime you can increase the power and retain tunability and reliability is a win in my book!
If anyone has any questions feel free to shoot me an email at and remember to listen to the review in Episode 247!